|
|
Joined: Jan 2015
Posts: 988 Likes: 7
Qualified Senior
|
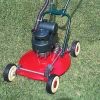
Started on the restoration of my Villager Automatic, I purchased it off Gumtree early last year ![[Linked Image from i313.photobucket.com]](http://i313.photobucket.com/albums/ll376/prc2008/image_zpslgj1va2o.png) ![[Linked Image from i313.photobucket.com]](http://i313.photobucket.com/albums/ll376/prc2008/image_zpscdoqaspu.png) I have had the mower stripped down for a while now but other jobs got in the way of making a start. The base and engine cowl received their first coat of paint stripper ![[Linked Image from i313.photobucket.com]](http://i313.photobucket.com/albums/ll376/prc2008/20160114_180826_zps6or3xdho.jpg) ![[Linked Image from i313.photobucket.com]](http://i313.photobucket.com/albums/ll376/prc2008/20160114_180749_zpsraury7yp.jpg) I was about to hit the cowl with its second coat of stripper when I spotted this ![[Linked Image from i313.photobucket.com]](http://i313.photobucket.com/albums/ll376/prc2008/20160114_180711_zps1moo69c7.jpg) It's not a sticker but what looks like a heat stamped transfer, first I have seen of this association. More to come :-)
Last edited by paul_c; 16/01/16 03:21 AM.
|
|
|
|
|
Joined: Nov 2013
Posts: 6,938 Likes: 322
Forum Historian
|
Hi PaulI think that's the first time I've seen the Ballaarat stamping. I guess the paint tends to camouflage it. It always amuses me - the spelling: The spelling of the name was a source of constant confusion.
It originated from two Aboriginal words "balla arat", meaning "resting place".
The municipality used the spelling Ballaarat as part of its corporate description,
but the town itself came to be known as Ballarat.https://en.wikipedia.org/wiki/City_of_Ballaaratp.s. The A.M.M.A. transfer is new to me too. -------------------------- Jack
|
|
|
|
|
Joined: Jan 2015
Posts: 988 Likes: 7
Qualified Senior
|
Up very early this morning as the forecast was for a very hot day, finished stripping all the old paint off and had the undercoat on by 9 o'clock ![[Linked Image from i313.photobucket.com]](http://i313.photobucket.com/albums/ll376/prc2008/20160119_101440_zpszppwrm37.jpg) ![[Linked Image from i313.photobucket.com]](http://i313.photobucket.com/albums/ll376/prc2008/20160119_101520_zps4kfoelmi.jpg) Top coat all on by lunchtime I painted the base Septone hammered silver but I must say the finish is disappointing, just looks silver ![[Linked Image from i313.photobucket.com]](http://i313.photobucket.com/albums/ll376/prc2008/20160119_135106_zpscq67l8ck.jpg) ![[Linked Image from i313.photobucket.com]](http://i313.photobucket.com/albums/ll376/prc2008/20160119_135035_zpsgklsj0by.jpg) ![[Linked Image from i313.photobucket.com]](http://i313.photobucket.com/albums/ll376/prc2008/20160119_152735_zpsfsxndmet.jpg) ![[Linked Image from i313.photobucket.com]](http://i313.photobucket.com/albums/ll376/prc2008/20160119_135044_zpsgjttwtfe.jpg) All the painting is done now so it will sit for a while to harden up, I have already attended to the engine which has great compression so I just have the carb and fuel tap to service and to tidy up the wheels :-)
|
|
|
|
|
Joined: Jan 2016
Posts: 387
Apprentice level 4
|
That's coming along a treat. What stripper did you use? Is the cowl aluminium? I ask as I know some stripers are caustic and caustic doesn't play well with aluminium.
This
Is going straight to the pool room.
|
|
|
|
|
Joined: Nov 2015
Posts: 637 Likes: 1
Qualified Senior
|
very nice! much better looking then my villager haha!
Thanks for reading!
|
|
|
|
|
Joined: Jan 2015
Posts: 988 Likes: 7
Qualified Senior
|
Hi slashnburn,
The cowl is pressed steel, I used Diggers brand gel stripper, I guess it is caustic as if you get it on yourself it burns instantly. It removes paint quickly, paint it on and use steel wool to remove the loose paint before it dries. I use gloves.
|
|
|
|
|
Joined: Jan 2016
Posts: 387
Apprentice level 4
|
Thanks mate. Looks like the stripper worked a treat. Always good to get a review/advice on something before shelling out the hard earned.
That Ballarat stamp is interesting as I'm not too far from Ballarat. I've come across a few collectables made there it would have been a very busy town in it's day.
This
Is going straight to the pool room.
|
|
|
|
|
Joined: Aug 2015
Posts: 202
Apprentice level 3
|
Hi Paul_c,
Your restoration seems to be coming along nicely. Thanks for the info on the paint stripper- my next 'learning experience' will probably be about surface prep. Just wondering, are there times you would use other techniques, e.g. wire/flap wheel? Other?
Also, how many undercoats and top coats did you do, and what was the undercoat (metal primer, etch primer, etc)?
I'm glad to see you hang your parts up by coat hanger off the porch/balcony/hills hoist/etc. too, at least I'm doing something right!
Patrick
|
|
|
|
|
Joined: Jan 2015
Posts: 988 Likes: 7
Qualified Senior
|
Hi Patrick,
Rust is the killer, that's when you have some work with sanding and filling etc. On this one there was no rust so I chemical stripped it and gave it a light sand. Undercoat is from Supercheap and its just a budget brand for metal, 2 coats light sand in between. Top coat is always a quality paint, usually 3 coats with a light sanding in between.
|
|
|
|
|
Joined: Aug 2015
Posts: 202
Apprentice level 3
|
Thanks for the info Paul and I look forward to the finished product!
What grit and/or type of sandpaper do you use for your light sanding, by the way?
Patrick
|
|
|
|
|
Joined: Jan 2015
Posts: 988 Likes: 7
Qualified Senior
|
I use Scotch pads, they are like a pot scrubbing pad but for automotive use. They come in various grades and are different colours, I use green and brown.
|
|
|
|
|
Joined: Jan 2015
Posts: 988 Likes: 7
Qualified Senior
|
Putting the frame back together ![[Linked Image from i313.photobucket.com]](http://i313.photobucket.com/albums/ll376/prc2008/20160122_102955_zpswo2csu2z.jpg) ![[Linked Image from i313.photobucket.com]](http://i313.photobucket.com/albums/ll376/prc2008/20160122_104458_zpsqkfpiswf.jpg) I would have liked some nicer wheels but they are the originals ![[Linked Image from i313.photobucket.com]](http://i313.photobucket.com/albums/ll376/prc2008/20160122_104505_zpspj7s3cxz.jpg) Nice to have easy to fold bars, would have been a good selling point ![[Linked Image from i313.photobucket.com]](http://i313.photobucket.com/albums/ll376/prc2008/20160122_104641_zps4kxo7uti.jpg)
|
|
|
|
|
Joined: Jan 2015
Posts: 988 Likes: 7
Qualified Senior
|
Engine on ![[Linked Image from i313.photobucket.com]](http://i313.photobucket.com/albums/ll376/prc2008/20160122_125519_zpsjg5doyfk.jpg) Couldn't resist a trial fit ![[Linked Image from i313.photobucket.com]](http://i313.photobucket.com/albums/ll376/prc2008/20160122_125654_zpszlhhfnqe.jpg)
|
|
|
|
|
Joined: Nov 2015
Posts: 637 Likes: 1
Qualified Senior
|
looking good Paul!
Last edited by Kye Turnbull; 23/01/16 04:30 AM.
Thanks for reading!
|
|
|
|
|
Joined: Jan 2015
Posts: 988 Likes: 7
Qualified Senior
|
Thanks Kye, Had everything fitted up ready for a trial run, I found an original fuel tap and fitted it up. I know they are prone to leaks hence the abundance of plastic Victa fuel taps which last for nearly a lifetime. Well where it didn't leak from, ditched it and fitted a new tap ![[Linked Image from i313.photobucket.com]](http://i313.photobucket.com/albums/ll376/prc2008/20160122_170543_zpsepxv6iey.jpg) ![[Linked Image from i313.photobucket.com]](http://i313.photobucket.com/albums/ll376/prc2008/20160122_170607_zpshoc7vrgk.jpg) ![[Linked Image from i313.photobucket.com]](http://i313.photobucket.com/albums/ll376/prc2008/20160122_170551_zpseear30hm.jpg) All good now, I will be using the mower so I don't want fuel leaks
|
|
|
|
|
Joined: Nov 2013
Posts: 6,938 Likes: 322
Forum Historian
|
Hi Pauland Contributors, I can't believe how quick you work! Just collecting the day's mail from the letterbox is a major project for me. The new Villager decal should look awesome on the silver base. The fuel tap is a sensible approach for vintage mowers that are used. The fuel bowl style tap was always a Villier's option - the standard tap was a push-pull brass one. Here's the original UK release one from January, 1957. Villier's Australia would have them in production by late 1957. Your machine, as you know, dates from the early 1960s, when the more common engine fitted to these was the Kirby 4-stroke. ![[Linked Image]](https://www.outdoorking-forum.com.au/forum/uploads/usergals/2016/01/full-7392-26522-villiers_jan_57.jpg) Another sensational restoration (in progress). ------------------- Jack
|
|
|
|
|
Joined: Jan 2016
Posts: 8,190 Likes: 233
SENIOR TECHNICIAN
|
Interesting info Jack, Villiers just releasing a 98cc motor when the Victa started as a 125cc and by 1957 they were heading into the 160cc, obviously the need for a bigger motor was there
|
|
|
|
|
Joined: Jan 2015
Posts: 988 Likes: 7
Qualified Senior
|
Had a bit of a fail with the fuel tank, after fitting the new tap fuel leaked and a aged some of the paint ![[Linked Image from i313.photobucket.com]](http://i313.photobucket.com/albums/ll376/prc2008/20160128_175828_zpsbxgry0hl.jpg) It wasn't the tap but it had leaked from the braising around the threaded insert for the tap. I had a spare tank so repainted it and fitted a brass fuel tap with new o rings ![[Linked Image from i313.photobucket.com]](http://i313.photobucket.com/albums/ll376/prc2008/20160128_175727_zpsmunprns6.jpg) Also fitted a newer type after market air filter supplied by John at Rustic spares. I had repainted an original but the filters are old and very worn, the new one is easier to maintain and much simpler to service ![[Linked Image from i313.photobucket.com]](http://i313.photobucket.com/albums/ll376/prc2008/20160128_175754_zpsefvsatwr.jpg) ![[Linked Image from i313.photobucket.com]](http://i313.photobucket.com/albums/ll376/prc2008/20160128_175818_zpsaaurq8xa.jpg) ![[Linked Image from i313.photobucket.com]](http://i313.photobucket.com/albums/ll376/prc2008/20160128_175702_zpsthh0x3xq.jpg) I can touch up the damaged area so no real harm done :-)
|
|
|
|
|
Joined: Jan 2015
Posts: 988 Likes: 7
Qualified Senior
|
All fitted up with not a drop of fuel anywhere, a few little things to sort then I will apply the decals ![[Linked Image from i313.photobucket.com]](http://i313.photobucket.com/albums/ll376/prc2008/20160129_124402_zpsahsyubxv.jpg) ![[Linked Image from i313.photobucket.com]](http://i313.photobucket.com/albums/ll376/prc2008/20160129_124416_zpsmq9jf6wy.jpg) ![[Linked Image from i313.photobucket.com]](http://i313.photobucket.com/albums/ll376/prc2008/20160129_124424_zpsycd2vkeg.jpg) Mowed some grass and it did a great job :-)
|
|
|
|
|
Joined: Nov 2015
Posts: 637 Likes: 1
Qualified Senior
|
can't wait to see it done Paul, looking great!
Thanks for reading!
|
|
|
|
|
Joined: Aug 2015
Posts: 202
Apprentice level 3
|
Looks great Paul and look forward to seeing it with decals.
Thanks for the tip about the Scotch-brite pads- I've used them at work for several years to polish metal, hadn't occurred to me to use them here- bit of a "d'oh!" moment for me!
Last edited by Pitrack_1; 30/01/16 10:00 AM. Reason: minor addition
Patrick
|
|
|
|
|
Joined: Jun 2015
Posts: 179 Likes: 4
Recycling and Repairs
|
Great job on the restoration. Did you get the decals fitted? Updated Photos :-)
I see the aftermarket air cleaner was also colour matched. :-)
Was paint used just from normal enamel spray cans, like KillRust?
Did you use a spray can clear coat to stop damage from fuel?
I've painted a mower using enamel spray can, but even after several months (no clearcoat applied), spilt fuel still affected the paint.
Cheers
Daryl
Environmentally friendly recycling at it's best
|
|
|
|
|
Joined: Jan 2015
Posts: 988 Likes: 7
Qualified Senior
|
Hi Daryl,
Paint was KillrRust red and a hammered finish silver, air filter comes in red plastic. The air filter is an aftermarket item but is very close. I'm not sure if clear coat protects the paint but should protect decals.
|
|
|
|
|
Joined: Jun 2015
Posts: 179 Likes: 4
Recycling and Repairs
|
|
Environmentally friendly recycling at it's best
|
|
|
|
Forums144
Topics12,729
Posts106,672
Members17,969
| |
Most Online40,124
Apr 13th, 2026
|
|
|
|

![[Linked Image from i313.photobucket.com]](http://s313.photobucket.com/user/prc2008/media/image_zpslgj1va2o.png.html)
![[Linked Image from i313.photobucket.com]](http://s313.photobucket.com/user/prc2008/media/image_zpscdoqaspu.png.html)
![[Linked Image from i313.photobucket.com]](http://s313.photobucket.com/user/prc2008/media/20160114_180826_zps6or3xdho.jpg.html)
![[Linked Image from i313.photobucket.com]](http://s313.photobucket.com/user/prc2008/media/20160114_180749_zpsraury7yp.jpg.html)
![[Linked Image from i313.photobucket.com]](http://s313.photobucket.com/user/prc2008/media/20160114_180711_zps1moo69c7.jpg.html)

![[Linked Image from i313.photobucket.com]](http://s313.photobucket.com/user/prc2008/media/20160119_101440_zpszppwrm37.jpg.html)
![[Linked Image from i313.photobucket.com]](http://s313.photobucket.com/user/prc2008/media/20160119_101520_zps4kfoelmi.jpg.html)
![[Linked Image from i313.photobucket.com]](http://s313.photobucket.com/user/prc2008/media/20160119_135106_zpscq67l8ck.jpg.html)
![[Linked Image from i313.photobucket.com]](http://s313.photobucket.com/user/prc2008/media/20160119_135035_zpsgklsj0by.jpg.html)
![[Linked Image from i313.photobucket.com]](http://s313.photobucket.com/user/prc2008/media/20160119_152735_zpsfsxndmet.jpg.html)
![[Linked Image from i313.photobucket.com]](http://s313.photobucket.com/user/prc2008/media/20160119_135044_zpsgjttwtfe.jpg.html)

![[Linked Image from i313.photobucket.com]](http://s313.photobucket.com/user/prc2008/media/20160122_102955_zpswo2csu2z.jpg.html)
![[Linked Image from i313.photobucket.com]](http://s313.photobucket.com/user/prc2008/media/20160122_104458_zpsqkfpiswf.jpg.html)
![[Linked Image from i313.photobucket.com]](http://s313.photobucket.com/user/prc2008/media/20160122_104505_zpspj7s3cxz.jpg.html)
![[Linked Image from i313.photobucket.com]](http://s313.photobucket.com/user/prc2008/media/20160122_104641_zps4kxo7uti.jpg.html)
![[Linked Image from i313.photobucket.com]](http://s313.photobucket.com/user/prc2008/media/20160122_125519_zpsjg5doyfk.jpg.html)
![[Linked Image from i313.photobucket.com]](http://s313.photobucket.com/user/prc2008/media/20160122_125654_zpszlhhfnqe.jpg.html)
![[Linked Image from i313.photobucket.com]](http://s313.photobucket.com/user/prc2008/media/20160122_170543_zpsepxv6iey.jpg.html)
![[Linked Image from i313.photobucket.com]](http://s313.photobucket.com/user/prc2008/media/20160122_170607_zpshoc7vrgk.jpg.html)
![[Linked Image from i313.photobucket.com]](http://s313.photobucket.com/user/prc2008/media/20160122_170551_zpseear30hm.jpg.html)
![[Linked Image from i313.photobucket.com]](http://s313.photobucket.com/user/prc2008/media/20160128_175828_zpsbxgry0hl.jpg.html)
![[Linked Image from i313.photobucket.com]](http://s313.photobucket.com/user/prc2008/media/20160128_175727_zpsmunprns6.jpg.html)
![[Linked Image from i313.photobucket.com]](http://s313.photobucket.com/user/prc2008/media/20160128_175754_zpsefvsatwr.jpg.html)
![[Linked Image from i313.photobucket.com]](http://s313.photobucket.com/user/prc2008/media/20160128_175818_zpsaaurq8xa.jpg.html)
![[Linked Image from i313.photobucket.com]](http://s313.photobucket.com/user/prc2008/media/20160128_175702_zpsthh0x3xq.jpg.html)
![[Linked Image from i313.photobucket.com]](http://s313.photobucket.com/user/prc2008/media/20160129_124402_zpsahsyubxv.jpg.html)
![[Linked Image from i313.photobucket.com]](http://s313.photobucket.com/user/prc2008/media/20160129_124416_zpsmq9jf6wy.jpg.html)
![[Linked Image from i313.photobucket.com]](http://s313.photobucket.com/user/prc2008/media/20160129_124424_zpsycd2vkeg.jpg.html)

![[Linked Image]](https://www.outdoorking-forum.com.au/forum/uploads/usergals/2017/02/full-9311-32987-villager_2_stroke_torque_dlx_with_villiers_7f_engine_1.jpg)
![[Linked Image]](https://www.outdoorking-forum.com.au/forum/uploads/usergals/2017/02/full-9311-32988-villager_2_stroke_torque_dlx_with_villiers_7f_engine_9.jpg)
![[Linked Image]](https://www.outdoorking-forum.com.au/forum/uploads/usergals/2017/02/full-9311-32989-villager_2_stroke_torque_dlx_with_villiers_7f_engine_5.jpg)
![[Linked Image]](https://www.outdoorking-forum.com.au/forum/uploads/usergals/2017/02/full-9311-32990-villager_2_stroke_torque_dlx_with_villiers_7f_engine_11.jpg)
![[Linked Image]](https://www.outdoorking-forum.com.au/forum/uploads/usergals/2017/02/full-9311-32991-villager_2_stroke_torque_dlx_with_villiers_7f_engine_10.jpg)


