|
1 members (Redgum102),
5,784
guests, and
490
robots. |
|
Key:
Admin,
Global Mod,
Mod
|
|
|
|
Joined: May 2015
Posts: 87 Likes: 1
Trainee
|
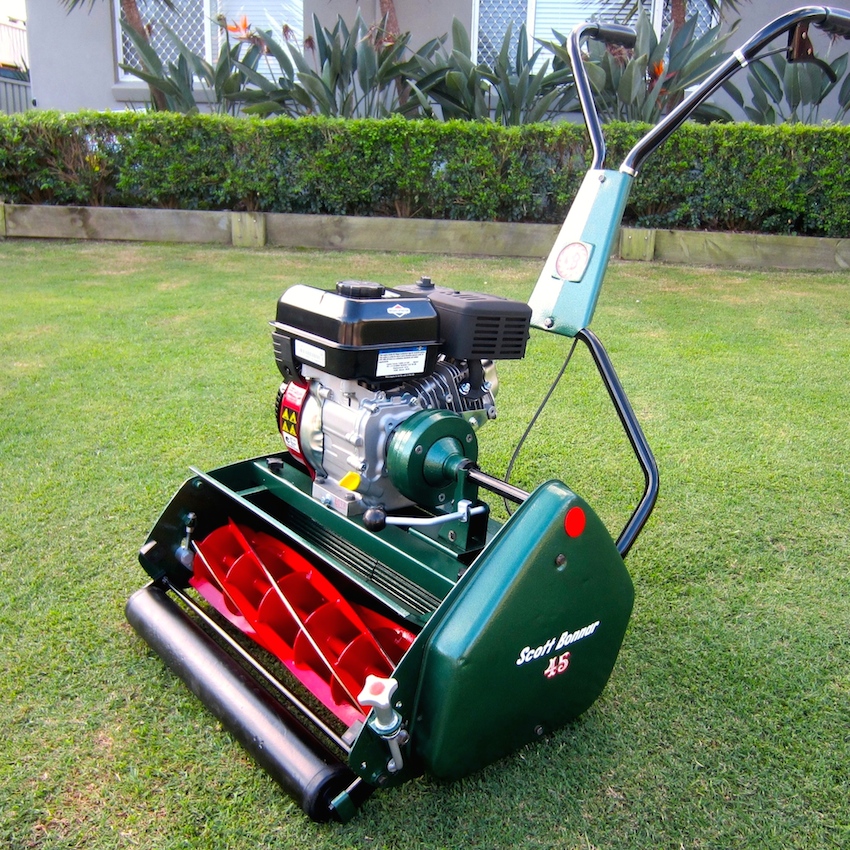
Hi Everyone, Just picked up 2 SB45's for $50 each from a deceased estate. One is a 17" and the other a 20" both with Briggs and Stratton mowers dated 1979(17" and 1977(20"). I have been reading the topics on here and tomorrow will get some detailed photos and numbers as seems to be required for valuable assessment by the experienced members on this board. I would like to get at least one operational asap and then look into restoring both or one soon after. I'm not sure if they are operational yet as the son whom I bought off was not completely up to date with his late fathers operation and maintenance of the units. These are my first cylinder mowers and I'm pretty excited to park the push reel and rotary mower combo i have been using. Thanks. MikeO ![[Linked Image]](https://www.outdoorking-forum.com.au/forum/uploads/usergals/2015/05/full-9269-21872-2015_05_20.jpg)
|
|
|
|
|
Joined: Jul 2005
Posts: 6,362 Likes: 11
Administrator - Master Technician
|
Hi mikeo, and a warm welcome to the forum. It's nice to have another Scott Bonnar Model 45 owner on board.  My congratulations on scoring a nice pair of Scotties there, mate.  What you have there are both Series 2 (twin rail engine deck) machines with the original Briggs engines fitted. In order for us to give you a correct assessment, we would appreciate you posting some close-up pics of the machines with the side chain case removed, and pics of all the sprockets (where the teeth are not covered by the chains) and some close-ups of the cylinder reel and bottom blade to assess the condition. Could you please post the whole string of numbers stamped into the metal air cowlings...These are the Model, Type and Code....See the pic here: ![[Linked Image]](https://www.outdoorking-forum.com.au/forum/uploads/usergals/2015/05/full-1147-21830-briggs_model_type_and_code.jpg) Grumpy, our resident guru on Briggs engines, can give you advice on any engine issues; Bonnar Bloke and I can advise on any issues with the chassis that you may have. Once again,  to OutdoorKing. 
Please do not PM me asking for support. Please post your questions in the appropriate forums, as the replies it may receive may help all members, not just the individual member. Kindest Regards, Darryl
|
|
|
|
|
Joined: Jan 2009
Posts: 6,926 Likes: 10
Pushrod Honda preferrer
|
Hi mikeo, welcome to Outdoorking.
Those SB45s look very promising in the picture, and worth far more than $50 each - especially the 20". Nevertheless they will naturally need some work to get them working to their full potential. The 17" in particular should not be operated until you have done this, since it looks as if the clutch has slid along the PTO and may now be in contact with the crankcase cover.
If you wish you can post some close-up pictures of the machines and get comments on some critical features, such as their originality, the remaining life of reels and bedknives, and the condition of chains and sprockets. They also need to be checked carefully for engine mounting rail cracks near the bolts.
Much of the trouble - aside from normal wear - that SB45s give is associated with the clutch between the Power Take-Off and the drive shaft. It is usually necessary to pay careful attention to this area and in all probability overhaul it, before putting these machines back into normal service. Unfortunately there may have already been previous neglect, which often results in cracked engine mounting rails. Such faults can be fixed, albeit with some difficulty, but prevention is far better than cure.
|
|
|
|
|
Joined: May 2015
Posts: 87 Likes: 1
Trainee
|
|
|
|
|
|
|
Joined: Jan 2009
Posts: 6,926 Likes: 10
Pushrod Honda preferrer
|
The broken blade in the reel obviously must be replaced and this is not a simple job. The sprockets are badly worn, which is usually a result of the chains having worn out first, nearly always due to failure to keep them clean and lubricated. It is evident that you have some money to spend. However to make a proper assessment of the condition of the machine you need to examine and photograph the frame rails and dismantle and inspect the engine shaft clutch. There are several threads on Outdoorking dealing with these matters.
I see that your clutch is of the later type with set screws rather than a captive cotter pin, and this probably means it is less likely to have come loose at some time and aggravated the characteristic vibration of the frame rails which causes them to crack. As a preliminary comment, aside from the broken blade and the worn-out chains and sprockets, the situation looks fairly promising to me. However what we need is comment from SB45 experts such as bonnar_bloke and Deejay.
|
|
|
|
|
Joined: May 2015
Posts: 87 Likes: 1
Trainee
|
|
|
|
|
|
|
Joined: Jan 2009
Posts: 6,926 Likes: 10
Pushrod Honda preferrer
|
The 20" has a 1977 engine, compared with 1979 for the 17", which means it is probably two years older. The reel and bedknife are in better condition on the 20" and look as if it may never have been resharpened. However the primary chain is shamefully loose, as well as dirty, rusty and unlubricated, and some of the sprockets are quite worn.
I am no expert, but that looks like an eminently restorable machine. I hope bonnar_bloke has time to take a look and put it into the context of his wide knowledge and particular enthusiasm for that model.
|
|
|
|
|
Joined: May 2015
Posts: 87 Likes: 1
Trainee
|
thanks for the reviews grumpy. i will await bonnar_blokes review but in the meantime will give them both a pressure wash and see if the engines run.
|
|
|
|
|
Joined: Jul 2005
Posts: 6,362 Likes: 11
Administrator - Master Technician
|
Hi again mikeo, I would agree with Grumpy, on first glance, I would say that the 20" machine would be the best to get up and running after some TLC. The Briggs engines, both being 3HP is a good thing as you can choose which is the better engine and swap them over if necessary. The plan of attack I would choose is to: (1) Remove the engine on the 20", inspect and post pics of both engine deck rails....(we will be looking for cracking) Check and inspect cutter clutch components for damage or wear and replace as required...(but I have a feeling all will be well there) (2) Remove the drive chains, 12 tooth engine sprocket and discard, remove the double cutter sprocket and discard. (3) Purchase new double cutter and 12 tooth sprocket and new primary and secondary chains. (4) Remove cylinder reel and soleplate with the bottom blade still attached and take both to an engineer/machinist for sharpening. Purchase new cylinder reel bearings and discard the old ones. (5) Grumpy will kindly help you with any engine issues, be sure to follow his advice carefully and you will have a good result. Looking forward to your further posts,
Please do not PM me asking for support. Please post your questions in the appropriate forums, as the replies it may receive may help all members, not just the individual member. Kindest Regards, Darryl
|
|
|
|
|
Joined: May 2015
Posts: 87 Likes: 1
Trainee
|
|
|
|
|
|
|
Joined: Jan 2009
Posts: 6,926 Likes: 10
Pushrod Honda preferrer
|
So the rails are cracked at all four engine mounting points, and most of the cracks have propagated for some distance. In the previous pictures both engines had proper B&S air cleaners, so I take it you removed them for these pictures. Here is what your governor linkage should look like: ![[Linked Image]](https://www.outdoorking-forum.com.au/forum/uploads/usergals/2015/05/full-2772-21912-bs_80202_carburetor.jpg) Here is what your choke linkage should look like: ![[Linked Image]](https://www.outdoorking-forum.com.au/forum/uploads/usergals/2015/05/full-2772-21913-bs_80202_choke_a_matic.png) So far I haven't seen anything wrong with what you have. Unless there had been interference from the previous tenant, that is what I would expect. I suggest you go through the normal check-out procedure for a new-to-you engine. The objective is to make the engine safe to run, then see whether it has spark, compression, and fuel. So begin by seeing whether the sump is full of clean oil. If it isn't, make it so. Then see if it has spark. To do that, remove the spark plug, attach the plug lead to it, hold it against the cylinder head, set the speed control in the full choke, full speed position, and pull the starter. As the engine spins, observe the spark plug gap to see if there is a steady stream of blue sparks. If there is, you have spark, so you can reinstall and reconnect the spark plug. Next, pull the starter and see whether you can feel resistance to pulling it, once every two revolutions of the clutch. Don't expect it to stop your arm as if you were cranking a Lister diesel on full compression, just see if it is noticeable. If it is, chances are it is enough. Then, on full choke, pull the starter say, three times and see if the engine fires. If it doesn't, reduce the speed control setting until the choke is open (the slide moves all the way in, flush against the carburetor) and pull the starter three times briskly. If it still doesn't fire, but it has spark and compression, we need to focus on fuel issues. With the speed control setting still in the choke-open position, remove the spark plug and put a small spoonful of petrol into the spark plug hole. Reinstall the spark plug immediately, reconnect the plug lead, and pull the starter briskly three times. If the engine does not fire, one of the three tests we've just done (spark, compression, fuel) was invalid and we need to repeat them to find out which. If the engine does fire but then stops after a couple of seconds we've established that the problem is in the fuel tank/carburetor/intake port system, and we can focus on that.
|
|
|
|
|
Joined: May 2015
Posts: 87 Likes: 1
Trainee
|
great stuff. will give that a go. just pulled one carby off and cleaned it all up. will reassemble now. yes i removed the filter for the photo. the 17" seems to be missing the stop switch according to the diagram.
|
|
|
|
|
Joined: May 2015
Posts: 87 Likes: 1
Trainee
|
what should the armature air gap be on these engines. they are uneven at the moment.
|
|
|
|
|
Joined: Jan 2009
Posts: 6,926 Likes: 10
Pushrod Honda preferrer
|
The gap should be the thickness of a standard cardboard visiting card. The reason most people use a visiting card is that it avoids having the measuring device attach itself to the flywheel magnet, which makes the job more difficult if it happens. The gap should be measured between the magnet and the coil's laminated iron yoke, not between the outside of the flywheel and the yoke. The gap is not critical, anything between say 0.012" and 0.018" will be fine, but do make it the same for both arms of the yoke.
|
|
|
|
|
Joined: May 2015
Posts: 87 Likes: 1
Trainee
|
still not getting a spark so i'll chuck a multimeter across the coil and check it out.
|
|
|
|
|
Joined: Jan 2009
Posts: 6,926 Likes: 10
Pushrod Honda preferrer
|
Both engines are pre-1981 so they have breaker point ignition, not Magnetron electronic ignition. You will need to make the standard checks until you find the fault.
|
|
|
|
|
Joined: May 2015
Posts: 87 Likes: 1
Trainee
|
ok some good success. the 77 engine had an upgraded ignition on it so switched it onto the better condition 79 motor on the 17" i got the engine to fire up and run well, although it does shake around alot.
the throttle doesnt seem to control the speed though, just the fan blade linkage. seems to run fine though. any tips on the linkage postions and throttle? it has an original SB throttle lever.
|
|
|
|
|
Joined: May 2015
Posts: 87 Likes: 1
Trainee
|
sorted now. one engine running like a charm  turns out that both reels have already had bearings done. the cogs and chains on 17" are pretty good. engine cog on 20" is very pointy though. how bad are the 20" cracks? should i weld them up now?
|
|
|
|
|
Joined: Jan 2009
Posts: 6,926 Likes: 10
Pushrod Honda preferrer
|
It isn't as easy as just "welding them up", mikeo. If you did that the chances are the alignment between the two side plates would be affected, and you'd end up with a corkscrew-shaped mower frame. It would be difficult to produce flat surfaces when you mowed if that happened. Successful repair requires stripping the mower down to a bare frame and repairing the multiple cracks with minimal heating, in very short runs on each crack, checking frame alignment constantly. You need to work out a sequence for those short runs so that their distortionary effects cancel each other out when the frame cools down.
|
|
|
|
|
Joined: Aug 2011
Posts: 2,998 Likes: 16
Former Moderator
|
Hi Grumpy and mikeo,
Firstly sorry for not chiming in earlier but I've not been on the forum for about 2 weeks now and as such have just fallen across this wonderful thread.
From first observations I must concur with Grumpy and Deejay that these are two very good examples of the later Scott Bonnar Model 45 version and at $50 each are a very good score indeed especially when you see some of the absurd prices asked for machines on ePrey.
The 20 inch machine is fairly hard to find in this last Alpine / Apple Green version before it's demise when Rover took over SB in 1980, but, and I say this with some reservation that this later twin rail chassis design really never suited the 20 inch machine. When I saw the first photos of the front rail with the engine still fitted I could instantly see the dilemma that you were going to be faced with once the engine was removed and sadly it's always a death sentence if not attended to correctly and promptly. Inevitably this condition leads to eventual rail sag and then total failure.
As Grumpy has made very clear this job is not for a novice to attempt, but rather for a very good "experienced tradesman" with a "TIG" welder (less heat induced) as once the rails are distorted with heat it's game over for that chassis. So I can't stress enough that you follow Grumpy's words of advice and strip the complete machine but leave the rear roller and sole plate installed so as to retain the integral structure of the side plate to top rail relationship and forward it on to someone that can guarantee their workmanship. It will be money well spent as a 20 inch fully restored to original machine is worth around $1600 on the open market.
To date I haven't seen a 20 inch machine that has absolutely no stress fractures in them so don't feel that what you are experiencing is anything unusual, but you have caught it early enough I must say. I also suspect that your 17 inch machine might have some fractures but to a lesser degree as it has already had it's clutch half replaced at some stage due to flogging out, which is what causes these fractures in the first instance.
The design changed from Cast Iron clutch halves to die cast alloy units using the same captive cotter fastening method and with time the cotter would start to loosen and then the flogging out of the precisely machined hole would just keep on getting worse and balance issue would just exaggerate to the point that the machine becomes uncontrollable. From here is where many operators would send the machine off to work out what's gone wrong, but by then the damage has been done and the mower shops will just replace the clutch half and give it back and not tell the owner about the fractures as they want the sale of the clutch and the remove and install fees to be paid. Yes there are some responsible ones out there to that would be up front prior to commencing work, but these are sadly getting less and less in a disposable world that we now live in.
BTW the clutch design changed again some time back to the one you have on the 17 inch machine which uses two set screws to pin the assembly properly to the PTO shaft at 90 degrees to each other. This newer method has worked much better than the captive cotter system.
As far as the welding is concerned I can't recommend anyone in your area to do this job for you so you'll have to ask around and do your own homework on it, but as I've said earlier make sure that the person doing the job stands behind his work as if it's corkscrewed as Grumpy says then all you have left is a pile of nuts and bolts and an engine. The 20 inch machine is all about "THE FRAME"
I will definitely stay tuned for more progress on this particular thread and help out the best I can, as do all the other guys here.
Cheers,
BB
I live a 24 Hour lifestyle, but every now and again I seem to fall asleep, well at least that's what my wife tells me.
|
|
|
|
|
Joined: Aug 2011
Posts: 2,998 Likes: 16
Former Moderator
|
Hi again,
This point is more so for Deejay and Cyberjack than anyone else and shows that both these mowers have the later serial number ID stickers opposed to ID plates.
I know that these stickers were used until the Rover take over in 1980 but it seems they were already in use in 1977 with the 20 inch machine displaying this type, 1978 with an edger I have and 1979 with the 17 inch machine pictured in this thread.
I also notice that the numbers of the mowers are in rough sequence for the two years of the mowers but my edger which is a model 38 has a much lower number than the 1977 mower has so that seems out of sync with continual numbering. We all know that the brass ID plated machines were all over the shop with no particular pattern that's yet to be discovered, as the same was for the Ally plated machines.
Cheers,
BB
I live a 24 Hour lifestyle, but every now and again I seem to fall asleep, well at least that's what my wife tells me.
|
|
|
|
|
Joined: May 2015
Posts: 87 Likes: 1
Trainee
|
Hi BB, Thanks so much for your inputs into this restoration. Initially I will be focussing my attention on the 20" with the aim of selling it on at completion(if i can bring myself to do so).
In regards to the twin rail engine mounts and the cracks, has anyone made any improvements to the rail design as part of the repair process? ie. cross bracing, solid plate between engine mounts? Its more than apparent that the cracks are common and I see this as a good opportunity to prevent history repeating, but keeping in tradition of the original SB style.
I'm also favouring the new engine treatment on the 20", compared to the original B&S engines, I would have to assume that there would be a lot less vibration from the motor itself, and also the cylinder orientation to the rails in the new B&S and Honda engines being at a 45 deg angle would likely change the application of forces through to the rails. Has anyone seen any crack propagation occur after fitment of newer engines?
Last edited by mikeo; 25/05/15 08:28 AM.
|
|
|
|
|
Joined: Aug 2011
Posts: 2,998 Likes: 16
Former Moderator
|
Hi mikeo,
One thing that the old Briggs and Rattlers were really good at and that was inducing vibration as that's how they are.
Honda's are the perfect upgrade for a 20 inch machine, for any machine I'd say, but one must think about originality or practicality when embarking on a restoration.
I've always said, the 20 inch twin railer was a design failure from day one and the 17 inch from day two. the earlier solid decks if maintained correctly are still the best design by far, but the twin railers do look a tad better though, but that's just my humble opinion.
Now as far as selling the machine is concerned your size lawn must be taken into consideration as the 20 inch is without a doubt the best machine for a largish lawn, but if a 17 is good enough you might be able to fund the 17 out of the proceeds of the 20, that's if you can get those rails repaired at a sensible cost or no cost a all by knowing someone in the trade of welding.
I've always thought of a piece of 5mm steel plate being welded into place between the two rails but hidden by the engine when fitted. To date I haven't seen it done yet and I think someone on this forum was against it when it was brought up once before.
Happy to be corrected on that though.
Cheers,
BB
I live a 24 Hour lifestyle, but every now and again I seem to fall asleep, well at least that's what my wife tells me.
|
|
|
|
|
Joined: Jan 2009
Posts: 6,926 Likes: 10
Pushrod Honda preferrer
|
BB, preventing the cracking while still having the vertical vibration induced by the engine, hinges largely on increasing the stiffness of the rails. There are two main generic ways to do this. You could increase the number and/or depth of the vertical flanges beneath the deck, which is essentially what the single deck machines had. Alternatively, you could box in the existing rails, preferably by welding a second set of identical rails upside down underneath them and welding the flanges of the original and upside-down rails together. Adding a flat deck contributes very little, except in increasing the ability to withstand horizontal vibrations from the engine.
I haven't seen or heard of a twin-rail machine having its rails boxed in (with the captive nuts for the engine mountings on the inside of the boxes, of course) but it seems like the most effective solution, though of course it does change the appearance of the machine.
|
|
|
|
|
Joined: May 2015
Posts: 87 Likes: 1
Trainee
|
I had a good look around at some other photos of cracking in SB's and did some thinking. The cracking is caused by lateral forces on the engine bolts being transferred to the captive nuts, as intended in the original design. The twin rail design is a significant improvement over the solid deck as they are allowed to twist and move independently of each other which lessens some of the cyclic vibrations into the complete frame. Stiffening the rails would remove this flexible feature.
The problem lies in the transfer of the lateral force to the rails. The connection between the captive nuts and rails is simply too small and incorrectly designed. All the cracks I have seen propagate from the two welds on each captive nut.
The best solution would be to remove the captive nuts, repair cracks, replace the nuts with a 5-6mm thick plate sized to fit between flanges of rail and 50mm long, drilled and tapped for engine bolt fixing. The 6mm plate needs to be welded in place of the captive nuts on all 4 sides with ~10mm long fillets in the centre of each side(not corners). That should allow the rails to do what they were intended to do.
|
|
|
|
|
Joined: Jan 2009
Posts: 6,926 Likes: 10
Pushrod Honda preferrer
|
I'm not yet convinced, aussietrev, but it is food for thought. I agree that the cracks may be propagating from the clamped joint where the engine mounts to the rails, since we often see cracks there which have not extended to the vertical flanges. Hence that feature would be odd if the problem is vertical vibration, since the top web of the beam should be stressed a lot less than the bottom edges of the flanges. However if the problem were horizontal vibration as you suggest, those holes are right on the neutral axis of the beam and therefore should not be stressed much - a little shear stress, but no tensile or compressive component at all.
The whole issue is contained in your first paragraph. If we can get to the bottom of what is causing the stress, the rest is easy.
Your proposed cure has the effect of greatly reinforcing the structure right at the point where the cracks begin, and that is very often an effective solution. I'm never happy though until I have an analysis that begins with a convincing explanation of how the cracks are being caused.
|
|
|
|
|
Joined: May 2015
Posts: 87 Likes: 1
Trainee
|
here is a good example of the cracks and nuts. its a leverage problem to be basic about it. the bolt length versus the nut radius isn't going to work. ![[Linked Image]](https://www.outdoorking-forum.com.au/forum/uploads/usergals/2015/05/full-9269-21947-img_0368.jpg)
|
|
|
|
|
Joined: Jan 2009
Posts: 6,926 Likes: 10
Pushrod Honda preferrer
|
If the bolts were being levered from side to side, and the joint had some compliance, that could generate cracks at the base of the nuts, where they are welded to the rails, due to local flexing. That seems to be consistent with your picture, mikeo.
I dealt with a possibly similar problem professionally once, very very long ago. In that instance there was a clamped joint where the pin at the top of a car's rear shock absorber passed through a hole in the floor pan. Cracks were developing at the hole in the floor pan and radiating outward. I fixed it by pressing a 2" diameter anulus (a toroidal indentation if you prefer) into the floor pan around the hole. This permitted the necessary deformation under load to occur over a substantial amount of metal some distance from the hole. It worked: no more cracking.
If this situation is similar, adding rigidity to the rails right at the bolted joints, as aussietrev proposes, could potentially cause very high loads on the engine mounts. At present the thin rails may be acting as compliant engine mountings, instead of the more usual (and durable) rubber blocks. I recall a building services engineer (well his job description said he was an engineer anyway) who had a locally-made centrifugal pump that was so badly out of balance that it continually over-stretched and broke its rubber mountings. This guy deleted the rubber mounts and bolted the pump to the structure, which happened to be the reinforced concrete roof of an office. This resulted in a continuous noise level in the office in excess of 90 dBA. By a miracle the bolts were strong enough to transmit the enormous vibration-induced loads they had to carry.
Perhaps a simple and workable solution in this case would be to sandwich 2-3 mm neoprene strips between the engine and the rails, together with similar isolation between the heads of the mounting bolts and the engine's mounting points. The objective would be to absorb the engine's vibration (both vertical and horizontal) in these rubber joints rather than transmit it to the rails and the rest of the mower. There might be an increase in operator comfort as well as structural durability.
|
|
|
|
|
Joined: Aug 2011
Posts: 2,998 Likes: 16
Former Moderator
|
Just to throw this in as mikeo has poo pooed the original design of Sid Bowadich,
Why is it that just about all the twin railers have this issue and the solid decks have hardly any, yes I have seen them in the solid decks as well but to no where near the degree as the twin rail design. Honestly just about every twin rail mower I see now has some level of this issue.
To be brutally honest, repair the cracks and use a Honda engine instead of a Kirby or Briggs. That will end it for once and for all as the Honda's are far more balanced than the early jobbies.
I live a 24 Hour lifestyle, but every now and again I seem to fall asleep, well at least that's what my wife tells me.
|
|
|
|
|
Joined: May 2015
Posts: 87 Likes: 1
Trainee
|
i'm not sure who sid bowadich is. has anyone had the rails repaired and run a honda engine on it for at least 20 years to see if it cracks?
the solid decks have a much larger surface area between the deck and underside of motor to generate more "friction" and lessen the lateral forces on the bolts. that would slow the cracking down, but makes sure all the engine vibrations would go into the chassis.
putting a neoprene or rubber block between the motor and rails would only increase the amount of lateral movement on the bolts. putting the larger tapped plates in place of the captive nuts would just mean the rails would twist rather that the captive nut twisting at the welds to the rails.
|
|
|
|
Forums144
Topics12,727
Posts106,663
Members17,965
| |
Most Online40,124
Apr 13th, 2026
|
|
|
|


![[Linked Image]](https://www.outdoorking-forum.com.au/forum/uploads/usergals/2015/05/full-9269-21878-img_0334.jpg)
![[Linked Image]](https://www.outdoorking-forum.com.au/forum/uploads/usergals/2015/05/full-9269-21879-img_0335.jpg)
![[Linked Image]](https://www.outdoorking-forum.com.au/forum/uploads/usergals/2015/05/full-9269-21880-img_0336.jpg)
![[Linked Image]](https://www.outdoorking-forum.com.au/forum/uploads/usergals/2015/05/full-9269-21881-img_0337.jpg)
![[Linked Image]](https://www.outdoorking-forum.com.au/forum/uploads/usergals/2015/05/full-9269-21882-img_0338.jpg)
![[Linked Image]](https://www.outdoorking-forum.com.au/forum/uploads/usergals/2015/05/full-9269-21883-img_0339.jpg)
![[Linked Image]](https://www.outdoorking-forum.com.au/forum/uploads/usergals/2015/05/full-9269-21884-img_0340.jpg)
![[Linked Image]](https://www.outdoorking-forum.com.au/forum/uploads/usergals/2015/05/full-9269-21885-img_0341.jpg)
![[Linked Image]](https://www.outdoorking-forum.com.au/forum/uploads/usergals/2015/05/full-9269-21886-img_0342.jpg)
![[Linked Image]](https://www.outdoorking-forum.com.au/forum/uploads/usergals/2015/05/full-9269-21887-img_0343.jpg)
![[Linked Image]](https://www.outdoorking-forum.com.au/forum/uploads/usergals/2015/05/full-9269-21888-img_0344.jpg)
![[Linked Image]](https://www.outdoorking-forum.com.au/forum/uploads/usergals/2015/05/full-9269-21889-img_0345.jpg)
![[Linked Image]](https://www.outdoorking-forum.com.au/forum/uploads/usergals/2015/05/full-9269-21890-img_0346.jpg)
![[Linked Image]](https://www.outdoorking-forum.com.au/forum/uploads/usergals/2015/05/full-9269-21891-img_0347.jpg)
![[Linked Image]](https://www.outdoorking-forum.com.au/forum/uploads/usergals/2015/05/full-9269-21892-img_0348.jpg)
![[Linked Image]](https://www.outdoorking-forum.com.au/forum/uploads/usergals/2015/05/full-9269-21893-img_0349.jpg)
![[Linked Image]](https://www.outdoorking-forum.com.au/forum/uploads/usergals/2015/05/full-9269-21894-img_0350.jpg)
![[Linked Image]](https://www.outdoorking-forum.com.au/forum/uploads/usergals/2015/05/full-9269-21895-img_0351.jpg)
![[Linked Image]](https://www.outdoorking-forum.com.au/forum/uploads/usergals/2015/05/full-9269-21896-img_0352.jpg)
![[Linked Image]](https://www.outdoorking-forum.com.au/forum/uploads/usergals/2015/05/full-9269-21897-img_0353.jpg)
![[Linked Image]](https://www.outdoorking-forum.com.au/forum/uploads/usergals/2015/05/full-9269-21898-img_0354.jpg)
![[Linked Image]](https://www.outdoorking-forum.com.au/forum/uploads/usergals/2015/05/full-9269-21899-img_0355.jpg)
![[Linked Image]](https://www.outdoorking-forum.com.au/forum/uploads/usergals/2015/05/full-9269-21900-img_0356.jpg)
![[Linked Image]](https://www.outdoorking-forum.com.au/forum/uploads/usergals/2015/05/full-9269-21901-img_0357.jpg)
![[Linked Image]](https://www.outdoorking-forum.com.au/forum/uploads/usergals/2015/05/full-9269-21902-img_0358.jpg)
![[Linked Image]](https://www.outdoorking-forum.com.au/forum/uploads/usergals/2015/05/full-9269-21903-img_0359.jpg)
![[Linked Image]](https://www.outdoorking-forum.com.au/forum/uploads/usergals/2015/05/full-9269-21904-img_0360.jpg)
![[Linked Image]](https://www.outdoorking-forum.com.au/forum/uploads/usergals/2015/05/full-9269-21907-img_0362.jpg)
![[Linked Image]](https://www.outdoorking-forum.com.au/forum/uploads/usergals/2015/05/full-9269-21908-img_0363.jpg)
![[Linked Image]](https://www.outdoorking-forum.com.au/forum/uploads/usergals/2015/05/full-9269-21909-img_0364.jpg)
![[Linked Image]](https://www.outdoorking-forum.com.au/forum/uploads/usergals/2015/05/full-9269-21910-img_0365.jpg)
![[Linked Image]](https://www.outdoorking-forum.com.au/forum/uploads/usergals/2015/05/full-9269-21911-img_0366.jpg)


