|
1 members (Bruce),
5,789
guests, and
1,513
robots. |
|
Key:
Admin,
Global Mod,
Mod
|
|
|
|
Joined: Jul 2007
Posts: 580 Likes: 2
Qualified Senior
|
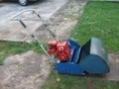
Hello all, I have a Briggs and Stratton sprint engine, 3.75Hp and the previous owner has broken the Carby mounting bolt that is incorporated into the engine block. Does anyone have any suggestions as to how to mount the carburetor now? I've tried epoxy (see photo)but that failed. I think the greasy/oily position did not allow it to set properly even though I tried to clean it up. Aluminium welding is not a viable option as i can get a replacement engine for less than $20 but I'm reluctant to do that as the engine runs perfectly. Any ideas? I hate throwing good things out. ![[Linked Image]](https://www.outdoorking-forum.com.au/forum/uploads/usergals/2015/01/full-1794-19485-imgp0601.jpg) ![[Linked Image]](https://www.outdoorking-forum.com.au/forum/uploads/usergals/2015/01/full-1794-19486-imgp0600.jpg)
|
|
|
|
|
Joined: Nov 2013
Posts: 693
Qualified Senior
|
Is it just a bracket that goes there? Hard to tell from the photo where the carby would actually sit but if it is just a bracket mounting point perhaps you can bend up something to fit there mounted off those two bottom threads with a captive nut braised or welded to it?
|
|
|
|
|
Joined: Jul 2007
Posts: 580 Likes: 2
Qualified Senior
|
Hi Aussitrev, sadly the female thread for the carburetor bolt is actually tapped into a moulded die portion of the engine block. I think it's kaput because even a helicoil wont be able to go there because the top section is broken off. Can you braze this alloy? I tried the "captive nut" idea with the epoxy that didn't work but brazing would be better.
Last edited by sparker; 06/01/15 01:11 AM.
|
|
|
|
|
Joined: Nov 2013
Posts: 693
Qualified Senior
|
I meant the nut to be brazed to a bracket so that it ends up sitting in the place of the existing broken thread. I don't know if you could weld to that alloy but the heat would be too much and you would have to strip the motor down to do it. Can you put up a photo with the carby held in situ and also separate? Might be able to get a better idea of how to rig a fix.
|
|
|
|
|
Joined: Jul 2007
Posts: 580 Likes: 2
Qualified Senior
|
You got me thinking about the brazing idea. A bit of research shows there are some products that claim to be able to do this. The instructions that I was looking at actually mentions lawnmower repairs to aluminium. Quick and easy brazing of aluminium . Then there is this product on Ebay Aluminium Repairs It's worth a try and if it does work I'll let you know here. Might take a few weeks to get here as it's coming from USA. Has anybody tried this stuff or anything like it?
|
|
|
|
|
Joined: Jan 2012
Posts: 1,391 Likes: 4
De-registered
|
Hey mate,
Ive been alloy brazing for 15 years. Most of the seemingly simple products that claim to work aren't that good. Ive tried most of them, but nothing comes close to the flux I use. Brazing of alloy, especially this size and thickness requires heat, and a lot of it. Brazing works just under melting point of the metal to be brazed, so the metal must be heated to a constant temperature during the duration of the job. In my opinion its not a viable solution as it would need to be stripped. Also you dont know the composition of the metal. You dont get a second chance with brazing as in the blink of an eye it can turn to powder...this has one of smallest windows of repair of any metal. Anyway if you choose this path, do your research as to the requirements and conditions from the seller.
In my tested opinion nothing brazes better than 16% silicon alloy rod and allubraze flux.
There is an alloy epoxy we use that is stronger than the alloy it bonds to at ambient temps, but when combined with high engine temperatures it will become pliable and fail.
A bracket as Aus says may be an option or even making a bracket and nut a
taping it into the casing and sealing with high temp retaining compound.
See how you go good luck:)
|
|
|
|
|
Joined: Jul 2005
Posts: 6,362 Likes: 11
Administrator - Master Technician
|
As always Mal, a well considered approach and thanks for posting...This advice could well save a member from reducing his prized possession to being a basket case, in one easy lesson.  Well done mate... 
Please do not PM me asking for support. Please post your questions in the appropriate forums, as the replies it may receive may help all members, not just the individual member. Kindest Regards, Darryl 
|
|
|
|
|
Joined: Jul 2007
Posts: 580 Likes: 2
Qualified Senior
|
I had a feeling that it was too good to be true. I would blow a hole in the crankcase for sure. Thank you for the experienced advice. Back to tinkering with a bracket fabrication.
|
|
|
|
|
Joined: Jan 2009
Posts: 6,926 Likes: 10
Pushrod Honda preferrer
|
sparker, I think you understand this already, but for the sake of the archives I'll say it. Trying to make the thing work with bracketry, without a solid mounting to the block located very close to the intake port, is unlikely to work well for any length of time and will absorb quite a lot of time and effort. As you said yourself, for $20 you can get a block in good condition, most likely with a good engine along for the ride. You are doing what many of us did in our youth, but now tend to dismiss as "a half-assed job".
In case it is relevant, later if not now, the rule of thumb I use, and I think many engine repairers use, is "Always fix it so it would be good enough for a paying customer". By doing that we save time and materials, and every job we do is useful experience. Doing half-assed jobs is not useful experience: it doesn't teach us anything that we can use to help other people.
I'm not claiming that you aren't entitled to do anything you want to your own engine of course, and if you enjoy doing it, and aren't trying to learn the "right" way in any case, by all means go to it.
Now that I've convinced you I'm either an arrogant swine or an insufferable know-all, I'll desist.
|
|
|
|
|
Joined: Nov 2013
Posts: 693
Qualified Senior
|
There is an epoxy compound that would probably do the job but I can't remember the name of it. I used it once to rebuild the nose of a crankshaft on a 4x4 when the harmonic balancer came loose and chewed it away. Worked fine for the rest of the life of the vehicle. It may have been http://www.loctiteproducts.com/p/epxy_weld_t/overview/Loctite-Epoxy-Weld-Bonding-Compound.htm. 3M also has one http://www.3mdirect.co.uk/3m-scotchkote-epoxy-metal-repair-sg-527-1.htmlIf you try something like it, drill a few small shallow holes into the metal to give it a locating point. You could even coat a suitable bolt in grease and put it into the broken thread area such that once the epoxy goes off you could unscrew it leaving a workable thread. Everything would need to be perfectly clean around the bond site though.
|
|
|
|
|
Joined: Jul 2007
Posts: 580 Likes: 2
Qualified Senior
|
Grumpy, it's a "love job" but, in the end, when everything has failed and I have spent hours and more dollars trying to fix something I could have replaced for less than $20 and suddenly realise I'm crazy, then and only then will I go out and by a sparkling second hand engine and solve all the problems.
I can't help myself. I just love tinkering and interfering with things. I need medication.
Aussietrev that epoxy is similar to the one I tried I think. I used "mega poxy" but mine may be more of a building/construction product than an engineering one. Thanks for the links.
As always, all advice is appreciated even the wrath of Grumpy!lol.
|
|
|
|
|
Joined: Jan 2012
Posts: 1,842 Likes: 14
Moderator
|
There are 'metal-filled epoxy putty' compounds that can be used for this sort of repair. Much easier to use than the less viscous 'liquid steel' types which come in twin tube packs.
The 'ITW Devcon' product range is about the widest of these; they offer fill metals that include aluminium, bronze, steel, stainless steel and titanium.
The snag is, that even the smallest available pack of one of these putties is going to cost well over $20! And the product's service temperature limit might be a bit low, for use on an air-cooled engine.
Surface prep and cleaning/degreasing of the metal surface is critical, too, as has been said.
Cheers,
Gadge
"ODK Mods can explain it to you, but they can't understand it for you..."
"Crazy can be medicated, ignorance can be educated - but there is no cure for stupid..."
|
|
|
|
|
Joined: Jul 2007
Posts: 580 Likes: 2
Qualified Senior
|
Thanks Gadge, Bluemhtmonaro also warned about the temperature and the effect on the epoxy. That would otherwise be the easy option.
|
|
|
|
|
Joined: Nov 2009
Posts: 134
Apprentice level 2
|
get some quick steel to attach a nut in there somehow if you are really desperate, it will most likely last the life of the mower if you do a good job, otherwise its a strip down and a tig or mig to re add the aluminum and retap the hole, or a new engine
|
|
|
|
|
Joined: Dec 2014
Posts: 13
Novice
|
If you were good friends with your local briggs dealer he could buy a brand new 450 series for $95+gst on pre season!
|
|
|
|
|
Joined: Jul 2007
Posts: 580 Likes: 2
Qualified Senior
|
well the brazing rods came and I had a go. I was using propane with a jewellers tip. The heat was dissipated all over the engine so that the rods would just curl up and melt without adhering to the mower metal-just like people said they would. Still, I can now cross them off my lawnmower bucket list.
|
|
|
|
|
Joined: Nov 2013
Posts: 693
Qualified Senior
|
Nice to see you persevering. Is that the type of Briggs that had the carby and fuel tank mounted together as one piece? If it is, I might have a crankcase that you could have for a couple of bucks plus postage.
|
|
|
|
|
Joined: Jul 2007
Posts: 580 Likes: 2
Qualified Senior
|
Thanks but I have written it off. Although I like to fix things I think I am wasting too much time on it for the sake of trying. I'll strip it of all the good things and send it to the scrap metal guy. Seems a shame though. If I had more skill I'd do something like you suggested.
|
|
|
|
|
Joined: Oct 2010
Posts: 1,819 Likes: 6
Junior Technician
|
On the sprag clutch/post type motors that had the band brake around the flywheel, kill switch setup, commonly fitted to MTD's etc, there was a metal tab that bolted to that post below the thread for the tank with a short 1/4" counter sunk screw. It had a hole for the tank bolt to go through and poked up to flywheel height.
Then the spacer collar was the width of it shorter than a normal one.
I will see if I can get a picture, of the tab, I'm sure I've kept one.
My solution would be get a short bit of steel. Drill a hole and tap a 5/16 thread into it. (or you could file down the post so you could weld a 5/16 nut on the back and have it sit in the right spot.
Then carefully drill two holes below it into the lower part of the post. Tap them and screw in two short bolts.
Trim down the spacer or the built in spacer bit if its a vertical pull starter.
Should last forever.
Bob.
|
|
|
|
|
Joined: Nov 2013
Posts: 6,938 Likes: 317
Forum Historian
|
![[Linked Image]](https://www.outdoorking-forum.com.au/forum/uploads/usergals/2015/03/full-7392-20848-locked.jpg) As this topic has been resolved by Sparker, I will now LOCK this posting. ------------------------------- JACK.
|
|
|
|
Forums144
Topics12,727
Posts106,662
Members17,963
| |
Most Online40,124
Apr 13th, 2026
|
|
|
|