Hi B_S, Speedy and B_B, I just thought up an idea after reading the theory B_S came up with in the paint possibly skinning during prolonged storage. Shake the can in various directions and angles for at least two minutes to give the marbles inside a chance to break up the skin as much as practicable and mix it into the paint. Then put it on the shelf again for a day or two to give the skin fragments a chance to possibly dissolve or at least soften enough to pass through the outlet easily together with heating the can.
Ahh, if only victa had kept producing the thumblatch catcher series, they would be in better shape today!
I called Ultra Colour at Windsor and they said they won't post spray cans due to being classed as a dangerous chemical. She said I would have to get a courier myself to deliver it. Is that how you did it?
The manager said you can apply it without primer right? That means I can just paint it over the existing factory paint on my mower deck and it should adhere properly?
Ahh, if only victa had kept producing the thumblatch catcher series, they would be in better shape today!
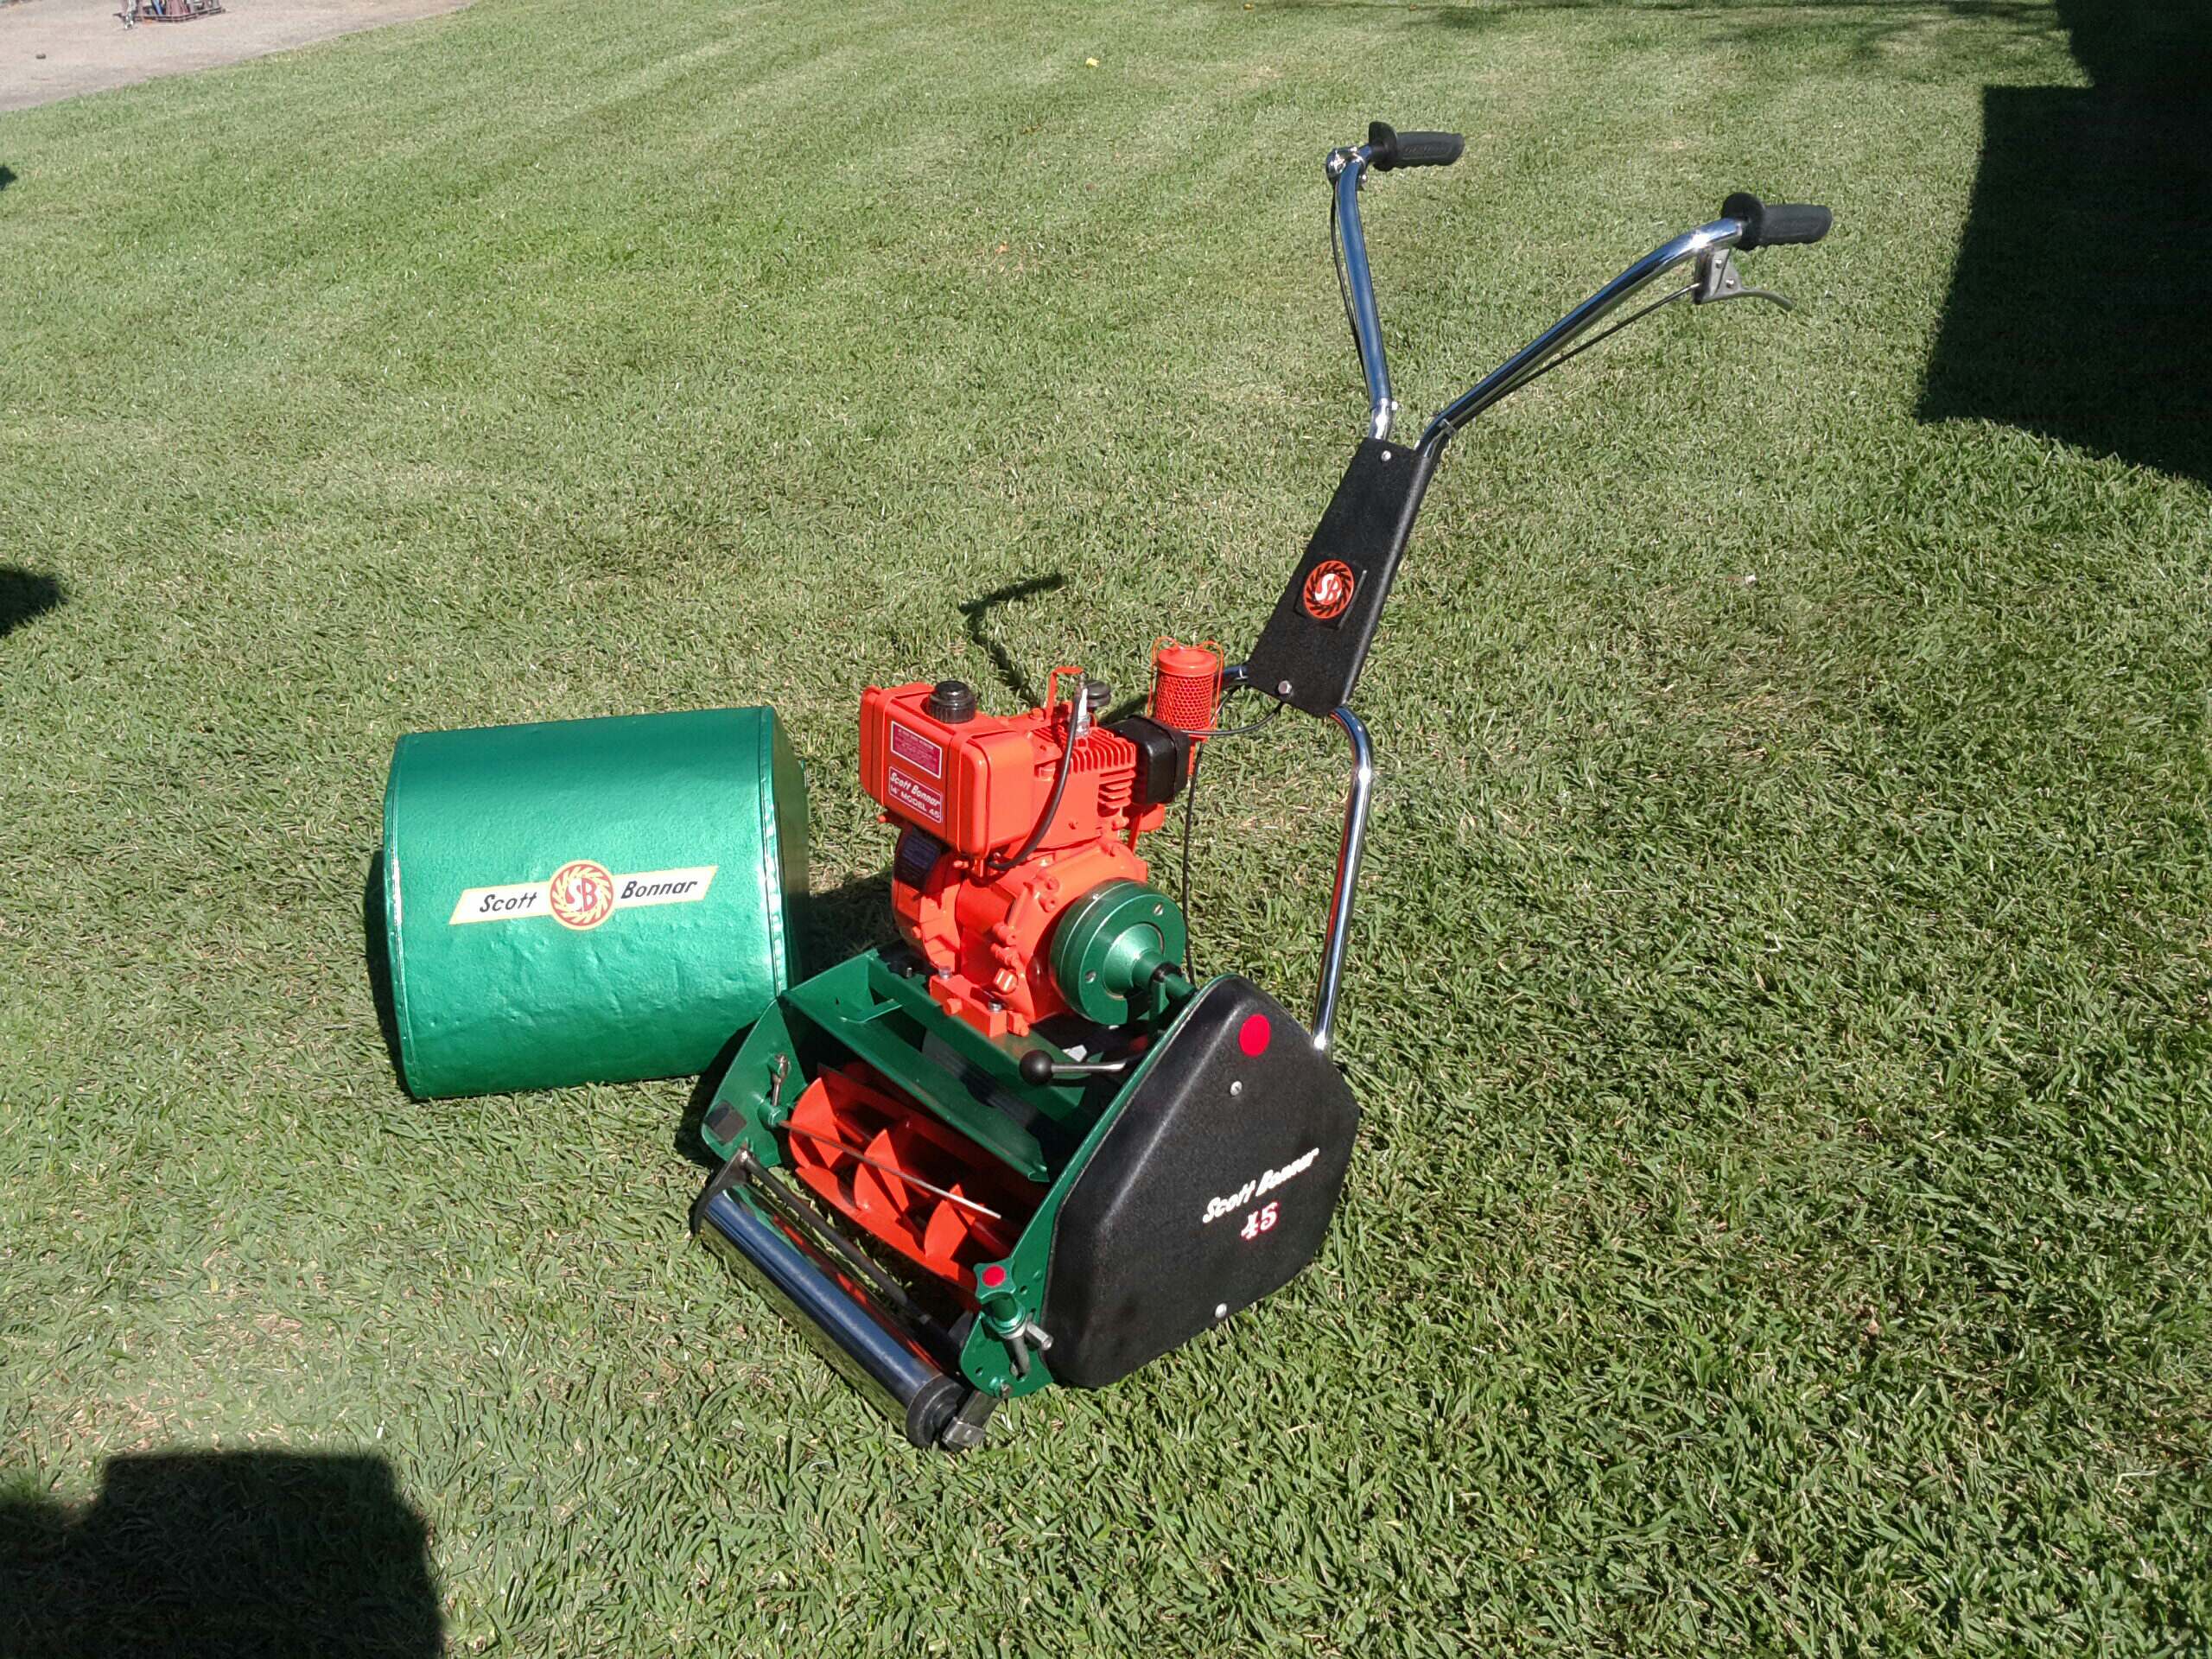
Hammertone was designed to spray over cast metal (iron, steel and Ally) which generally had a finished surface full of imperfections and with the way the paint cures out it pretty much has the ability to hide a multitude of sins underneath it. As such most machinery which was made up of castings was painted with Hammertone.
You can most certainly spray it over existing painted surfaces but surface prep must be done just like any other paint requires for adhesion.
Debbie is the person to speak to at Ultra Color, but don't expect miracles that's for sure.
Cheers, BB.
I live a 24 Hour lifestyle, but every now and again I seem to fall asleep, well at least that's what my wife tells me.
I was quoted a freight charge of something like $20.00 but had to order a box as they wouldent ship cans in a lose box (fair enough) I decided to drive there cause I dident want to spend $80.00 on paint and freight when I thought I only needed $20.00 worth plus there were other things I wanted to do out that way and thought I could get what I needed for the coast of just the freight charge. Obviously had to drive back there again cause the 4 cans dident get verry far and they said if I returned the 4 faulty cans they would supply me a box of 12 for my troubles plus I had to finish my mower as I was half way through it. If they were closer I would be going there all the time as they have plenty of other paints such as cold gal etc and their prices are cheap even if you only get half a can out of it. Funny thing is we still want this paint even though we know the cans are duds. Maybe if UltraColor stumble across these posts they may realise that people may want this colour more now than when they were supplying it years ago before the lawnmower craze. I don't want to bag the company their paint is excellent hence why we want to go back for more, just a shame their not making new batches due to poor sales and over stock of the old batch. If this paint had the thumbs up I reckon most SB restorers would be using it as their is no off the shelf green hammer in a spray can that is close enough to the Avocado green unless colour matching which means mucking around with compressors thinners and the clean up, that's if you have the skills and setup.
Thanks B_B and B_S for telling of your experiences with the paint. I think I'll just go and get it by car as I would like to try the green paint on my Waltons store brand mower that the green will look nice on. B_B, what grit do you use for preparing the surface and is prepsol good enough a cleaner or soap and water and a dry in the sun better? As seen in the pics provided, there is exposed aluminium as well as some filed down Selleys Knead It epoxy filler (green arrow) on the edge. Would a spray of etch primer be advisable on the exposed bits? Any pointers on the chrome work of the nose cone and handles on the store brand in the last pic ? There is supposed chrome in a spray can but I do know it will never match real chrome, but one I used to use from Septone at Super Cheap Auto was a cut above plain silver.
P.S how many cans of each should I get? I was thinking three to start with.
Ahh, if only victa had kept producing the thumblatch catcher series, they would be in better shape today!
I would go over the whole lot with 120 grit paper and then finish off with some 400.
Then I'd prime the whole lot with a good etch primer as you are dealing with Ally here. As far as wax and grease remover is concerned I always use Prepsol or equivalent just prior to painting.
After priming I rub back using wet 800 grit but make sure you have a good coverage of primer so you don't go through it when rubbing back.
From there you're ready for a good well shook up can of Ultra Color Hammertone Green.
Give it a light coat of green and let it flash off for a couple of minutes and then hit it with a wet coat, but not too heavy otherwise you'll end up with runs on the vertical areas. Try and keep the surface as horizontal as possible as this way you'll get a good finish without any runs.
I must admit I ran all my parts through the oven once they were able to be handled well enough without finger marking them.
In saying the above you probably won't be able to bake a whole chassis so it will have to remain out in the sun for a few days. One thing I have found though with this paint is that even though it might feel dry to handle it will still be soft deeper within the paint, so don't be in any rush to do the fit out of parts for at least a week if not more. I've found that I sat my clutch body on it's engine side downwards on my bench for a few days only to move it yesterday to find that I had an impression of the timber surface of the bench pushed into the paint. Luckily it's the surface that you won't see as it's against the engine once the component is bolt up.
Cheers, BB.
I live a 24 Hour lifestyle, but every now and again I seem to fall asleep, well at least that's what my wife tells me.
Definately etch primer the ally, the guy at UltraColor told me it was recommended. Just for curiosity if you pick up some paint can you report back the batch number? BB and I have the same batch guessing it will all be the same.
Good old Waltons, my mum worked for the department store in the city head office was her first job and always talks about it, she still has her Waltons name badge. She would love that mower.
As for the Ultracolor Hammer deep green, BB is correct while it seems dry after days even a week, don't put any pressure on the paint as you will disfigure the finish, I did the same thing after assembling the clutch and sitting all the weight on one end. Guessing the silicon takes a while to harden up, but in saying that my catcher soleplate and grass deflector is still holding up after a few months of mowing.
Thanks for the instructions B_S and B_B. I thrive on instructions, not making judgment calls lol. It's invaluable to know how this paint behaves once applied, particularly being hard as wood on the surface, but still like taffy underneath! That's a good heads up.
I recently painted up a replica of a Jason hockey mask with PlastiCote from a can and despite it saying fully dry in 48 hrs, decided to wait a week before handling. Right to the hour, a week passed and it still gave off a solvent odour but I thought surely it's cured plenty. Wrong. To my horror, my finger marks stayed visible in certain light and nothing I tried, such soapy water removed them. Then, even worse, after using making tape to paint on the blue chevrons like in the fifth movie, the tape left impressions all over the white part. Luckily you have to look carefully up close in the right light to detect them. From more than two feet away, it looks flawless. I'll have to attempt to carefully rub back the marks down the line with 2000 grit wet and dry. How long do you have to leave it though, a month, six weeks, half a year?!?
Ahh, if only victa had kept producing the thumblatch catcher series, they would be in better shape today!
I guess B_S will be a better judge of this issue as he's painted both his mower and edger some time ago now. The mower I did a few months ago for my neighbour across the road, to this day still hasn't even been started or used. Honestly I think he likes the idea of simply ogling at it and being able to say to his mates that he's got a pristine one sitting in his garage. Anyway at least I'm not getting any warranty claims made on the paint work at this stage.
I'll probably have my Groomer up and going before his even gets started.
Just on a bit of progress on my project, I wired up all my fasteners and brackets etc. that were originally Zinc plated and took them down to the Electroplaters this morning and as a few of you on here know I'm actually a plater by trade. So guess what happened when I came back for them 2 hours after I dropped them off ? .........................He screwed them up and as such he now has to redo them. He says it's pretty embarrassing doing this to a platers job and swears he wants them to be absolutely perfect for me. I'm really starting to wonder what one has to do to get good help nowadays.
Cheers, BB.
PS. Bon_Scott........ I bet they've got a pallet of this old stock paint that they refuse to toss out, instead they continually annoy folks that buy it and progressively destroy their business in the process.
I live a 24 Hour lifestyle, but every now and again I seem to fall asleep, well at least that's what my wife tells me.
Hey MF, Here's that BrightGal I use by Boston.. it's pretty cheap $10 or something. Made in USA. It's a zinc paint. I even touched up my new 2nd hand Holden VE...... It just looks like chrome and sticks like babypoo to a blanket. cheers speedy
........................Keep your blades sharp......................
Hi Speedy and B_B, I think I have seen this brand at Bunnings. From memory Speedy got it at Auto Barn. Good luck finding an AB outlet near you. There aren't as many as there used to be -in Sydney at least. There's one quite a drive away from me on the Central Coast -at least there used to be.
Ahh, if only victa had kept producing the thumblatch catcher series, they would be in better shape today!
MF, At least 3 Bunnings within 10 mins, Repco, 5 mins, Mitre 10 4 mins, Super Costly 8 mins, Home Hardware and AutoOne not sure, but trust me having all those stores doesn't make it worth moving here apart from the fact we don't have any smoke here at the moment
Well I think that we've solved the Ultra Color Deep Green Hammertone issue as I left a full can out in the really warm sun yesterday for a few hours and then shook it up for about a good solid 10 minutes and then managed to spray the whole can without any issues at all.
So I guess that the concept of the paint skinning is what's happened and if not broken up completely it will create issues with blockages up the inside feeder tube. The heat induced certainly facilitates the breaking down and desolving of the unwanted skin inside.
Cheers, BB.
I live a 24 Hour lifestyle, but every now and again I seem to fall asleep, well at least that's what my wife tells me.
That's encouraging news B_B!! So the secret is probably to shake the can for an abnormally long time after being warmed up for a few hours in sunlight. Will you try this on one of the blocked our partially blocked cans, presuming you can restart one? Must see if it works on another. Ten minutes is a long time but better safe than sorry. I wonder if you could use a stop watch and do a total of ten minutes with time out as long as the total shaking time adds up to ten minutes?
So glad it worked for you. It's a beauty of a colour for SB restorations or refreshment of appearance. They need to keep making it!!
Ahh, if only victa had kept producing the thumblatch catcher series, they would be in better shape today!
I'd pretty safely say that it won't work on an already blocked can.
Because that would've gone hard halfway up the pick up feeder tube.
Also I've thrown out all the blocked cans now so can't really experiment with one of those. Maybe B_S could have a crack with one of his cans still laying around.
Cheers, BB.
I live a 24 Hour lifestyle, but every now and again I seem to fall asleep, well at least that's what my wife tells me.
Well after dropping all my fasteners and associated originally Zinc plated components off at the Electroplaters on Friday morning, I was shocked when I went back 3 hours later to find that they were all black and messed up. I was told that they would have another go at them on Monday morning. Honestly I couldn't believe it, what a mess they all were.
Anyway I decided to drop in again first thing this morning and ask if I could do them there myself as some of you might know that I'm actually a retired Electroplater by Trade. The owner of the shop said I'm most welcome to if I want and hey ! who am I to knock back an opportunity to get back into it after not doing this type of work for over 35 years. Nothing has changed and after 3 hours I walked out with all my gear noicely plated and looking like brand new nuts and bolts etc.
Sadly I didn't take any photos of all the 5 long strings of wiring up after it came out of the bath and as such I've already sorted it all out ready for re-assembly of the chassis. I just now have to polish the handle bars so that they can go to a different shop to be chromed again as the shop I went to today only do Zinc Plating and nothing else.
Regardless, it's all coming together nicely and will certainly outshine all my other machines, that's for sure.
Cheers, BB.
PS. regarding the paint tins one could drill a very fine hole with the can laying on it's side, but make sure you've got a good large absorbent rag on hand, maybe a second operator would be helpful in this instance with the rag / towel.
I live a 24 Hour lifestyle, but every now and again I seem to fall asleep, well at least that's what my wife tells me.
I've cut open many spray cans that the spray nozzle didn't work , I just throw a metal spike into the can from 1 meter away, the spike is a round 2 foot rod about an inch thick with a sharp point on one end.
I wouldn't drill a hole into a flammable pressurized container, It's not the drilling that will get you, It's the electric spark created by the motor in your drill, look into the vents in your drill and pull the trigger, that blue arc you see plus fuel vapor equals KaBoom.
Never had any problems with the spike idea ,cut open more than 50 spray cans this way.
Sounds like a great job on the electroplating BB,If you want a job done right ,do it yourself .
I got about 6-7 blocked cans, haven't had much time lately as I have been snowed under with so much going on. If I get a chance I might see if I can warm the cans up and see if they come back to life. 10mins to shake the can up sounds like damn hard work, might have to pull out Harry Belafonte and shake shake shake Senora. Glad you figured it out BB I still got a few more full unused cans so hopefully I can now run them dry.
I guess the the drilling idea wasn't the sharpest thing I've come up with. Maybe using a very sharp smaller size nail and laying a rag over the whole area while laying the can in an open vice so it's contained and supported. Then just swiftly drive the nail in just enough to pierce the can and allow the pressure out. Make sure you have plenty of rag on hand so that any expelled paint doesn't make a mess of everything around you.
After that one must enlarge the hole that's been made in the lower section of the can so as to drain the remainder out and put it into an airtight container.
B_S,
as far as shaking them for around 10 minutes is concerned just take a can with you where ever you go around the house and continually shake it when your hand is free. You'll be surprised how quick 10 minutes goes past.
I'm about to put a photo up of the handle bar assembly fully polished in raw steel.
Cheers, BB.
I live a 24 Hour lifestyle, but every now and again I seem to fall asleep, well at least that's what my wife tells me.
Well check out the difference, and yes it's the exact same pair of bars, no substitution here.
One shot before and the other after polishing. Please note these have not yet been off for chroming yet. That's about to happen next week.
This is a process that's pretty much not obtainable without the correct gear, firstly I sent the bars off to have the old chrome stripped and also pickled so as to remove the rust.
From there I started off with 3 different Glazing wheels followed up with a Sisal Polishing wheel using "Carbrax" Medium Greasy polish.
I'll post photos up after the chrome work has been completed.
The last photo is about as bad as what's left behind of some of the massive rust pitting that was on this set. Note that this photo is taken in Macro setting and as such the naked eye will hardly notice it. If I was still in the plating industry I would leave these bars in the Copper Bath for a fdull day and then re-polish these back down to the steel thus leaving any pitting filled up with copper and thus leaving the surface totally unblemished.
This process is called Copper Polishing an item
I live a 24 Hour lifestyle, but every now and again I seem to fall asleep, well at least that's what my wife tells me.
Hi there B_B and Bon Scott, that's an astonishing result. I wish I was up to speed on what polishing compounds to get. I would be happy to leave mine that way If I wasn't going for a hard core restore. Here are what I have. First are three discs for use with a drill. They are about 1 & 1/2" diameter. One is sand, the other two a Scotch Brite type scourer discs, one red, the other brown. The other is a drill mounted polishing kit for precious metals with three grades of polishing of 3" diameter pads and three grades of compound. I'd consider handle bars as precious lol.
Ahh, if only victa had kept producing the thumblatch catcher series, they would be in better shape today!
Well a few update photos of how things currently stand.
The Handlebar shield is basically finished and now sports a "Genuine Brass plate badge" exactly the same as the original that was removed in the machines tear down. This is not the reproduction decal as most folks purchase via eBay, rather it was obtained from George at "BonMods". The Chain case and catcher decals also arrived today from our ODK Member "Willingworker" who predominantly does all the lawnmower decals that are listed and sold via eBay.
And today the Verti-Cutter Reel has been finished off and is ready for installation and action. Check out the photos below.
I've chosen Red as the colour for it as it pretty much represents how a normal cutting reel would look in sit-u with most folks restorations.
Another 3 hours were spent this morning on the polishing of the handlebars from what is pictured above and were today delivered to "A Class Metal Refinishers" who are located at Lonsdale in Adelaide's southern area. They seem to be the only Electroplating shop left in Adelaide that specialise in restoration chroming. I've looked at some of their work and it basically can't be faulted from where I can see it. Hopefully I should get them back around next Wednesday.
I live a 24 Hour lifestyle, but every now and again I seem to fall asleep, well at least that's what my wife tells me.
Freaking amazing B_B. I can't get over the quality of the hammered paint in the first photo. The lighting is great for close up examination. Did you bake it? Love the cutting reel too. Well done. Logo looks awesome as well.
Ahh, if only victa had kept producing the thumblatch catcher series, they would be in better shape today!