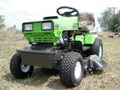
Finally got myself a TAC have been looking for one at the right price for a while. Really would have liked a full crank electronic ignition but have quite a few powertorque's for spares and I can't wait forever for a FC to turn up.
The bloke that owned it said he wouldn't be there when i went to inspect it but said he had it running the day before, which is doubtful as i couldn't get it going. He had left the fuel tap on and it was basically out of fuel. Apart from a faulty decompressor no other major issues that i could see. Seemed to have good compression, spark, no play in the bearings plus a good circular blade. Seems OK for 50 bucks.
After the pic's gave it a degrease and wash off and started to strip it down a bit to wash out the tank and clean the carby. One of the top cover screws was seized, ended up drilling the head off, Realized after taking covers of that this machine had been subject to the elements and rust and electrolysis have invaded, so soaking relevant bolts and screws in 'Yield' over night. The carby was typically oily of a neglected machine.
Will probably keep strippin' her down now and maybe a repaint. Being my first Powertorque to work will no doubt have some questions.
Hi Bushie, and my on a great score for $50! Once stripped down and painted and re-assembled, you will be amazed what these machines can do...especially with the circular blade...they are almost self-propelled and pull themselves along...(at least mine does! ) Great machine....well done mate,
Please do not PM me asking for support. Please post your questions in the appropriate forums, as the replies it may receive may help all members, not just the individual member. Kindest Regards, Darryl
OK Theo, today I started. Wanted to see how she ran so after cleaning the carb and giving it a primer plate "O" ring and carb to inlet "O" ring. Blowing out the snorkel with compressed air and a new air filter. Put on a donor decompression valve, replaced fuel, decompression and governor tubes. Seeing how it was pumping oil out of the exhaust port, thought a few table spoons of fresh 40-1 fuel, into the cleaned out tank, would do for a short test.............started first pull!
It's difficult to see into the exhaust port, never-mind take a photograph, but I wanted to get some affirmation that what I'm seeing is cross hatch, or rather, machining marks running around the diameter of the bore? Surely not.
Should I take off the carb inlet to inspect the exhaust side of the bore? Is there supposed to be an exhaust gasket on these?
Because of corrosion will paint the frame and handle with paint I have on hand, won't spend much on it if I don't have to as I will keep it.
It had a Bosch R 10 (?) plug in it, replaced with known good CJ8 for test.
Did a bit more on the TAC today. Had a go at getting the stub of the ground off screw out without luck. Checked my donor mower's pull start, and it was good, so did the transplant. Was amazed at the new looking condition of the TAC's internal crankcase, zero movement in the bearings. On the second start up yesterday realized there was small change in the revs with throttle movement so took off the carby inlet, needed an O ring. On the exhaust side of the bore the 'machining marks' are visible with just an indication of piston ware. Replaced the kill switch rubbers and gave her a run, one pull start and ran nicely through the rev range and stopped as it should. Looks like it's going to be a cheap refurb :yay: Having another go at posting bore picture for assessment .
Last edited by Bushie; 16/10/1401:17 AM. Reason: Paragraphs again!
Hi Bushie, the bore looks reasonable and usable. The marks in it dont go up and down but rather laterally so thats a good sign of the piston not scraping. You will need to remove the manifold as well to look into the bore to see the exhaust side but the piston won't drop down low enough to see the upper part of the bore. With the pison at TDC you can see the lower part of the exhaust side of the bore but the window is very small. If the piston and rings look good from the exhaust side and the motor runs fine then it would be a "fair" assumption that the bore is in reasonable shape also. There is no muffler gasket/seal. Powertorques are far easier to do a minor rebuild on than full cranks. If you want some peace of mind, a piston and ring kit is cheap enough or even just slip in a new set of rings if the piston is in good shape.
Thanks for that Bigted. I did remove the manifold and look at bore and piston, the bore is showing minimal signs of piston/(ring) marks and the lateral marks are still visible.
Would I still re-ring it?
My biggest concern at the moment is trying to sand off the powder coat, and then what to prime it with?
I still have some etch primer left, which was used on the Super 600. Will that be OK to use? As I don't think I'll get rid of all the powder coat.
Trying to keep costs right down on this one.
Don't remove the powder coat at all. It makes for an excellent surface for paint to adhere to as it's tough and durable and wont flake off in a hurry. Just give it a good rub to knock the shine off so your new coat has something to stick to. As for the rings, if it's running fine and starts easy then leave it alone. Do the basic service items and put it to work. If and when it require a re ring, do it then, it ain't going anywhere. Most TAC's have do very little work compared to mowers, so if a 2 stroke can go 20 years on the same rings then your TAC should go 20 more.lol On the subject of longevity, you stated earlier that you used a 40:1 fuel mix..... DON'T!! Use the correct 25:1 otherwise you could run the risk of damaging rings/piston etc.
Well had already removed most of the powder coat the reason being, as you will see in the first pic, there was bad corrosion over a lot of the area. I did however sand to key in on all the remaining powder coat, then primed with left over etch primer this morning. Hope it will suffice.
Regarding how much work this TAC has done; that thought had crossed my mind when opening the crank and it looking almost new lol. Will leave it be.
Re the 40-1, the engine had tried to be started multiple times and it had lots of oil in it, only used a little to see if it would start when O rings were added etc. Normally I always use 25-1.
For the record have included a couple of pics (haven't seen them posted before) of taking the spring pressure off the tilt mechanism to dismantle and using a puller on the pulley, flywheel combo. Recalled a post by Grumpy explaining to tighten puller a little and tap the 'bolt' end tighten again progressively. Certainly seemed to be needed in this case as it was extremely tight and a worry with the cast iron, worked great thanks Grump.
Last edited by Deejay; 18/10/1403:15 AM. Reason: Localised Images
Started reassembly today. Considering how little work the engine has done was amazed at how badly the tyres were scruffed and worn out, so replaced the wheels with some ball bearing one's off donor mowers. Will have to replace bearings one day.
Couple of pic's. Put the height adjuster and rear offside wheel on first, remembering how convenient these items were for holding the frame in a nice position for working underneath.
Had thought I was on the ball remembering to put the bottom exhaust clip in before bolting the engine down, only to see afterward that the clip had slid around requiring loosening the bolts again....duh! It pays to put the near side rear axle on before mounting the tilt adjust/belt tensioner bar and housing, it can be done but awkward.
Probably shouldn't have painted the above mentioned bar as a little gripy for the belt tension, if it gives any trouble will wire brush it. Tidied up barrel and crankcase with a quick brush paint. The paint on the frame is a couple of remnant cans of Galmet more than 15 years old!
BTW thanks DJ for localizing/correcting images. They used to upload straight off(?)
Have a problem with fitting the blade, seems like there is maybe a washer missing.
When I tighten the blade it pushes onto the bearing case, as can be seen by scruff marks out from the center hole on the blade. I though maybe the (concave/sprung?) flat washer might go between the blade and the inner bearing race, then a (missing) flat washer under the nut??
Looks Good Bushie, yes they do take 2 concave washers, one on either side of the blade. The inner concave washer is probably a little more critical as it pushes up against the bearing but you could get away with a flat washer on the outer side. A readily available concave washer that comes to mind is the one that holds the blade carrier from a victa.
Finished this a while ago, thought I'd better update. Regarding the missing blade washer; found a suitable flat washer and 'panel beated' a concave on it, using a suitable socket, used that as the not so critical (thanks again Ted) outer washer.
Ran around the 30 meter+ bamboo stand (future windbreak also captured in above pictures), in very quick time.
Found I was stooping a bit at the handle bar so used the longer upper bar of the same free donor mower that had also donated the starter and housing and its decompressor. Also three ball bearing wheels of other donors.
All up costs were: O rings and stop rubbers $10 Paint about.....................10 air filter...........................2 tube................................1 A couple of bucks for sundries. And time?......who cares
Will probably have to replace the belt one day as the previous tenant (to use Grumpys term) had obviously lost the above mentioned washer and tried to run it without!! Therefore scoring the belt.
It is a first pull starter. Shame I have no decals, but guess I know what they would imply. Not as pristine as some on here but all up very pleased with it for the cost.
Yep, the ODK Shop can assist, but it can be a bit tricky to find the good disc type blade on the website, as shown in the above post. These apparently do a much better job than the straight blades.

![[Linked Image]](https://www.outdoorking-forum.com.au/forum/uploads/usergals/2014/10/full-7837-17967-victa_tac_edger.jpg)


![[Linked Image]](https://www.outdoorking-forum.com.au/forum/uploads/usergals/2014/10/full-7837-17973-victa_tac_edger_2.jpg)
![[Linked Image]](https://www.outdoorking-forum.com.au/forum/uploads/usergals/2014/10/full-7837-17974-victa_tac_3.jpg)

![[Linked Image]](https://www.outdoorking-forum.com.au/forum/uploads/usergals/2014/10/full-7837-18001-pa140826.jpg)
![[Linked Image]](https://www.outdoorking-forum.com.au/forum/uploads/usergals/2014/10/full-7837-18002-pa140828.jpg)
![[Linked Image]](https://www.outdoorking-forum.com.au/forum/uploads/usergals/2014/10/full-7837-18040-pa160829.jpg)
![[Linked Image]](https://www.outdoorking-forum.com.au/forum/uploads/usergals/2014/10/full-7837-18041-pa160831.jpg)
![[Linked Image]](https://www.outdoorking-forum.com.au/forum/uploads/usergals/2014/11/full-7837-18245-pb010837.jpg)
![[Linked Image]](https://www.outdoorking-forum.com.au/forum/uploads/usergals/2014/11/full-7837-18246-pb010838.jpg)
![[Linked Image]](https://www.outdoorking-forum.com.au/forum/uploads/usergals/2014/11/full-7837-18285-pb030837.jpg)

![[Linked Image]](https://www.outdoorking-forum.com.au/forum/uploads/usergals/2014/11/full-7837-18420-pb050840.jpg)
![[Linked Image]](https://www.outdoorking-forum.com.au/forum/uploads/usergals/2014/11/full-7837-18421-pb050839.jpg)
![[Linked Image]](https://www.outdoorking-forum.com.au/forum/uploads/usergals/2014/11/full-7837-18422-pb050838.jpg)


