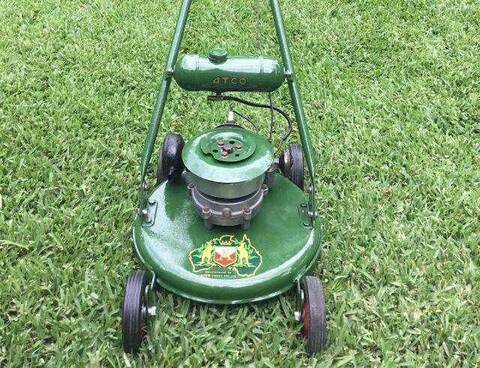
I recently purchased a 2nd hand series 80 tilta cut 2 stroke edger - looks good as little used & sold by son of retired user. I saw it running but it was sluggish which was put down to being stored for long time. I was happy to go ahead as I had previously downloaded the operator instructions from this website. However having stripped it down to check and clean I have noticed: the vacuum tube emerging from the cowl is not connected to anything.There is a small white plastic tube in the carb (opposite end to cap and bulb shown in carb assy on p10 of manual) - this white tube had a flared end barely sticking out of the carb but it broke off when I touched it. Can someone tell me if the vacuum tube connects to that. Am I able to replace the white tube - what is left of it is embedded in the carb body.
Emerging from the engine block is an electrical wire with a thin rod like brass end ( I think this is pictured on the stator assy diagram on p10 of manual, with the other end of wire attached to condenser connection). Again, the brass end is not connected to anything and it is not obvious to me where it should go. Help would be much appreciated please.
The hose from the cowling goes to the back of the carburettor on the cover that goes over the diaphragm.
The second hose that you say the white part snapped out of goes to the decompressor that hides under the cowling, as for the white part breaking off sometimes the hose will stay on fine without it.
My lack of tech experience means I am back again. This time I have uploaded a photo which I didn't realise earlier that I could do. As hopefully you can see I only have one brass rod tipped wire - the only other wire has the eyelet connection that bolts to the engine casing. Also I can't see any holes under the filter hose. Could you give me more exact location.
Turning to hoses - you can see that currently the hose from what I take to be the decompressor is connected to the carby diaphram cover. I'm pretty sure I haven't mixed up the hoses so could I ask you to let me know if that is correct.
I have marked with black tape the vacuum tube hose that emerges from the cowling. You can also see the broken white plastic pipe in the carby body. I don't think it is possible to attach anything so I am wondering if it is possible to drill out the buried bit and fit a replacement.
Hi young, I also have a Series 80 engined Victa T-A-Cut, so I have had a look, and here is where it appears everything goes.
(1) the tubing from the fuel tank goes to the carby diaphragm cover. (2) the tubing with the black tape (from the de-compressor) goes to where the white broken piece is. (you could drill it out carefully and find a small piece of hard tubing to fit) (3) the wire with the eyelet fitted goes under the first cowl attachment bolt (near where the fuel tank lead is in your pic) (4) the black wire with the brass rod on the tip, geos into the left hand side (yes there is a hole) of the rubbergrommet above the air-cleaner snorkel hose. Hoping this helps, best of luck with it,
Please do not PM me asking for support. Please post your questions in the appropriate forums, as the replies it may receive may help all members, not just the individual member. Kindest Regards, Darryl
Darryl, Many thanks, I have found the hole in the grommet- what a relief.
I think I am describing the 'diaphram cover' on the carby differently to you. When you are describing the tubing from the fuel tank connection do you mean to the face of the carby to the front that has the white cap with the rubber bulb.
I will have a go at drilling out the broken tube and finding a bit of hard tubing. Again, many thanks.
Please ignore my last question _ I have reconnected the fuel line, as well as the vacuum tube line and the engine runs beautifully now (and it stops properly).
Darryl, Apologies for coming back again but something that you wrote in your post of 16/2 has caused me to seek confirmation. If you look at my uploaded photo, the tube that I didn't know what to connect to (marked with black tape) and which you said should go to the broken connector on back of carby is the vacuum tube. This vacuum tube goes to a needle size air inake clipped to the cowel. In your post you said that that tube goes to the decompressor. Again, as you can see from my photo, the tube from my decompressor is currently connected to the side of my carby. This is how it was sold to me but it could well be that the seller has been tinkering and I note that Joe Carroll in his reply also said that the tube from my broken connecter should go to the decompressor. Could I trouble you to have another look at your Tilta 80 and let me know please. regards
Hi Young, here are some pics of my TAC 80 so you can see, hopefully, where everything goes: Fuel Line to front of carby. Decompressor to rear carby body where you had the white broken bit. From under the engine cowling to side of carby. Eyelet to under first cowling bolt. I have decided to remove my cowling and take these pics so you can see exactly where they go, so there is no confusion. Decompressor to where your broken tubing was. Vacuum tube from its attachment on cowling to side of carby I hope these pics are of help.
Please do not PM me asking for support. Please post your questions in the appropriate forums, as the replies it may receive may help all members, not just the individual member. Kindest Regards, Darryl
Darryl, What can I say - thank you so much for all your trouble and time. Absolutely clear now that my machine was set up incorrectly. I have swapped over the two offending tubes to match yours and Tilta fired first pull. I was a bit surprised to find that the connection of the HT lead to the sparkplug is a slotted screw, partly screwed into the lead and then covered by the rubber shroud. However that it what it looks like in the parts manual. If that is wrong, when you have a moment perhaps you could let me know - but its not critical.
I am looking forward to trying the Tilta on my grass verge but I think its going to take about a week to dry out!
Hey Joe, on a great score there man, I paid $160 for mine on ebay and had it gone over, very kindly, by Bruce. The Series 80 full-crank engine is a beauty, first pull starting on mine. Can't wait to see the pics Joe. BTW, I painted my handles with white gloss Killrust...came up a treat! Also Joe, think about putting on a Victa edger disc, (better than the blade, by far!) Part No: ME 63222 in the Online Store. PPS, Here's a pic of my handles during painting!
Please do not PM me asking for support. Please post your questions in the appropriate forums, as the replies it may receive may help all members, not just the individual member. Kindest Regards, Darryl
Hi Joe, has your TAC got all its decals? If it has, can you take some good clear close-up pics please? I am missing 2; (one on the blade guard upper surface and the small one for the fuel tap position) We could then put them in a "Decals and Stickers Topic" and then send the set by email to Rustic Spares who can duplicate them for us.They then can be sold through the online store to our members who need 'em.
Please do not PM me asking for support. Please post your questions in the appropriate forums, as the replies it may receive may help all members, not just the individual member. Kindest Regards, Darryl
Thanks Joe, that is good news. You will find when you put the disc blade on, that the edger will almost pull itself along whilst cutting the groove and grass edge....I prefer a fairly deep groove and it leaves a brilliant finish.
Please do not PM me asking for support. Please post your questions in the appropriate forums, as the replies it may receive may help all members, not just the individual member. Kindest Regards, Darryl
Good stuff Joe, please let us know how you get on.
Please do not PM me asking for support. Please post your questions in the appropriate forums, as the replies it may receive may help all members, not just the individual member. Kindest Regards, Darryl
one small tip is when restoring the look of faded plastics is a acetone moistened rag. it will wipe off all the powdery stuff and expose nice new looking plastic (just be careful not to melt all the plastic away). if you then use a little used sump oil to rub over it the plastic after using acetone it will shine. regards jay
Hi mowernut, are you sure about acetone on stickers and decals? Acetone is nail polish remover and will dissolve thermo-plastics readily.
Please do not PM me asking for support. Please post your questions in the appropriate forums, as the replies it may receive may help all members, not just the individual member. Kindest Regards, Darryl
i meant more the actual plastics rather than the stickers, you are right though it wouldn't do the stickers them selves any great deal of good. i use it for the plastic shrouds on briggs quattros ect more so so i suppose you have to use your initiative and do a small spot test first. regards jay
I've got this same exact problem with my Victa T-A-C. The nipple where the decompressor tubing plugs onto the back of the carby has simply snapped off from the carby body.
Hi oldmatty, and a warm welcome to the forum. It's great to have you aboard. Now to your problem; There is only one sure way to rectify this prob and that is to replace the carby body...the reason is that its not possible to re-glue or attach the nipple back in place properly and air leaks will inevitably cause probs and erratic running of your T-A-Cut.
Your machine uses the Victa G4 carby and the body is available as a spare part in the Online store....Click HERE This body is used on both the powertorque and Series 80 full crank engines (ie, Victa T-A-Cut)
Please do not PM me asking for support. Please post your questions in the appropriate forums, as the replies it may receive may help all members, not just the individual member. Kindest Regards, Darryl
oh ok i was hoping to just drill and tap a very small hole and screw a plastic hose fitting in with a bit of plastic-weld on the threads to seal her up cos really its only a vac line for the decompressor
If its the kind with the white bit/barb on the end, i have just put the hose on whats left of the black and it is usually long enough.
Another option could be, depending on where you live, a dead victa is only about $20 away. Chances are if you clean the carb out and put it back on said dead mower it will go like a beauty and you will not want to wreck it.
Matty, if your epoxy glue will bond properly to both the carburetor and the small barb or elbow you want to fit, and if you put a fair-sized fillet (i.e. a substantial ring of epoxy to join the barb to the carburetor) for a few mm all around, you can fix it in a way that will be stronger than the original carburetor (which isn't saying much). The problem is that there are many kinds of plastic that epoxy will not bond to, and unless you do a test piece first, you won't know whether you have a fix or a mess.
That wasn't what I was describing: you had spoken of screwing a barb into the cover, then expoxying it as a reinforcement. That is what I said might be stronger than the original, if the epoxy bonded to both parts. Just gluing something to a surface with epoxy is not very strong at all. It is up to you of course - worst case, it falls off.
Hi oldmatty, I hope your repair method works for you...Just remember, one extremely small air leak could give you buckets of problems. I sought advice from Bruce (our forum administrator) for you; his recommendation was for a new carby body as the best option also. Best of luck with it,
Please do not PM me asking for support. Please post your questions in the appropriate forums, as the replies it may receive may help all members, not just the individual member. Kindest Regards, Darryl


![[Linked Image from i266.photobucket.com]](http://i266.photobucket.com/albums/ii247/deejay66_photos/DSCF0719.jpg) Fuel Line to
Fuel Line to ![[Linked Image from i266.photobucket.com]](http://i266.photobucket.com/albums/ii247/deejay66_photos/DSCF0720.jpg) Decompressor to
Decompressor to ![[Linked Image from i266.photobucket.com]](http://i266.photobucket.com/albums/ii247/deejay66_photos/DSCF0721.jpg) From under the engine cowling to
From under the engine cowling to ![[Linked Image from i266.photobucket.com]](http://i266.photobucket.com/albums/ii247/deejay66_photos/DSCF0722.jpg) Eyelet to
Eyelet to ![[Linked Image from i266.photobucket.com]](http://i266.photobucket.com/albums/ii247/deejay66_photos/DSCF0724.jpg) Decompressor to where your broken tubing was.
Decompressor to where your broken tubing was.![[Linked Image from i266.photobucket.com]](http://i266.photobucket.com/albums/ii247/deejay66_photos/DSCF0723.jpg) Vacuum tube from its attachment on cowling to
Vacuum tube from its attachment on cowling to 
 on a great score there man, I paid $160 for mine on ebay and had it gone over, very kindly, by Bruce. The Series 80 full-crank engine is a beauty, first pull starting on mine. Can't wait to see the pics Joe.
![[Linked Image from i266.photobucket.com]](http://i266.photobucket.com/albums/ii247/deejay66_photos/CosmeticRestoration5.jpg)