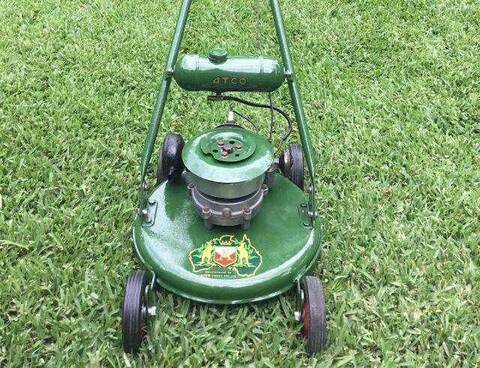
Looks like the time has come for me to replace the Piston & rings in my Lightweight, I cant easily inspect the barrel on this 85cc motor until I get it apart so I hope that it is not too scored/damaged. I have a new piston and rings but ideally I would also like to replace the seals. I have managed to get hold of one genuine HA25337 seal but I need one more and for many months now nothing is coming up here in the U.K.
I have taken measurements of the new genuine seal with a micrometer, the dimensions are 42 x 18 x 8 (OD x ID x W), the nearest one I can find from bearing/seal suppliers over here is 42 x 18 x 7 so 1mm thinner than the genuine one - what do you guys think.. would this be close enough to use as a replacement..? maybe to use it as a top seal with an additional washer if needed..??
Hi Alan, 7mm will be fine and don't worry about using a washer the seal will sit there fine. Just put a smear of sealant around the outside and a wipe of oil on the seal face before you fit it and it will be fine as long as the shaft surface is in good condition. Being the bottom seal it might need cleaning up with emery paper
Great to see you are keeping busy on here, I've been reading your posts with interest, especially your G4 carby mods. Thanks for the good news, I went ahead and ordered one before you posted as it was only £4, I'm just a little nervous now about stripping this little motor down for the re-build as I really love this machine - it's my regular workhorse during the summer, I'd be lost without it..!! Soon as I get the seal I will take the plunge, what would you use to seal the crank case halves..? Which Loctite product would you use/recommend?
Hi Alan, good to see somebody is reading all the multitude of carby posts and it keeps the mind spinning Your little lightweight will keep you happy for years to come. You can use any sealer you like whatever is cheap or whatever you have on hand, silicone will work fine if you have it. Just a smear is all it needs it only has to hold vacuum so there is no big pressure in there
G'day folks, The Repair Manual [Gregorys No. 199] I have that covers this engine, says to use Loctite 504 Gasket Eliminator, for sealing the crankcase joint - a thin bead, taking care to run it all the way around each stud and bolt hole.
This stuff is pretty exy, for a one-off job, so I'd look for a high-temp silicone equivalent from the Permatex range, at your local motor parts factor.
Crankcase flange bolt and stud nut torque spec is 15 lb-ft/20.3 Nm, BTW. And just seat the seal flush in its bore, as you'd do with the thicker version.
Cheers, Gadge
"ODK Mods can explain it to you, but they can't understand it for you..."
"Crazy can be medicated, ignorance can be educated - but there is no cure for stupid..."
One problem with using silicone is, it may not be fuel resistant or corrosion resistant , the 504 would be a good sealer but there are other choices if you are only repairing one mower and want a cheaper sealant, here are a couple others you could use.
Maybe I'm over thinking things but I've never broken down an engine to this level and put it back to working condition again. I really don't want to stuff up this up, I'm not sure I will come across another one of these again.
I've gone with the Permatex 29132 option, thanks again for the tips/links guys, you have saved me a good few quid there. I have ordered an 80ml tube but It's also gonna take a while for delivery as it is coming from Lithuania @ £10.50 (about a quarter of the price for Loctite 504).
One more question (when I get to it) is where do I position the ring gaps? I read a post somewhere on here about this being important but I cant find it again. Other than that, I have bought a honing tool and a torque wrench (thanks for the 15 lb-ft setting Gadge).
Hi Max, Just in reference to the silicone not standing up to the fuel, I have used it for about 30 years on bolting carbies to manifolds on cars and I use it on the pull start seal on the PT's and on the inlet manifolds if I ever need to change one and so far I can't recall ever having an issue with the fuel causing me problems so I can only go on personal experience. In Alans case here who cares if the seal started to fail in years to come, it is only a 15 min job to pull the barrel, split the cases and reseal if ever needed which I would be amazed if the silicone didn't hold.
That Permatex 29132 looks to be the ideal silicone sealer for this job. Very similar to crankcase joint sealers that some motorcycle manufacturers [Yamaha and Honda, that I know of] have offered for that exact application, for a long time now.
The new piston should have ring locating pegs in the ring grooves, on the exhaust side of the piston. These determine which way up the rings are fitted, as well as the gap position.
Cheers, Gadge
"ODK Mods can explain it to you, but they can't understand it for you..."
"Crazy can be medicated, ignorance can be educated - but there is no cure for stupid..."
I use fuel to dissolve silicone when removing it ,a lot of silicones are not fuel resistant ,if I recommend using one I would state the brand name just so people don't buy the wrong product that was why I gave a warning about using silicone.
I have been using Permatex Ultra Black and Ultra Grey for the last ten years sealing both 2 and 4 cycle engines. The only problem I had was when I first started using it and that was my fault. I wasn't allowing the product to cure properly before putting into use. Many of the Husqvarna/Poulan clam shell chainsaws are put together with the Permatex Ultra Black which is exposed to 2 cycle fuel mix when in use.
As I said at first even the 4 cycle OHV valve covers would leak within a few months when I didn't wait for the product to cure. Now I wait at least 12 hrs before final torquing and the adding of oil or fuel mix to the system. I know the label say 30 minutes but the 12 hrs seem to more inline.
Yes Max Honda and Yamaha do have their own Hondabond and Yamabond products for sealing the crankcases but I haven't tried either yet or had a need to.
The new piston should have ring locating pegs in the ring grooves, on the exhaust side of the piston. These determine which way up the rings are fitted, as well as the gap position.
Hi Gadge, The piston I bought came with the rings already fitted? it looks like its an aftermarket part but I didn't have the choice of buying a genuine one here. I will have another good look at the downloads, I downloaded lots of info a while back but I have changed laptops a couple times since then. Before I go ahead with this I think I need to do a bit of swatting up.
Originally Posted by Mowerfreak
Howdy folks, Alan, you choose a good beginner's engine to rebuild. How did you find out about that compound and in Lithuania?!?
Hi Mowerfreak, I could have got it from the UK but it was quite a bit more expensive, being a tight arse (and not in too much of a hurry) I went with the cheapest ebay seller, otherwise I would have just paid the odds. I hope this one will be straight forward, I have a V100 utility (125cc) in the shed, I've got the gaskets/piston/rings but no seals, otherwise that may have been my first re-build as a dry run.
As always, I cant thank you all enough for your input and advice guys. I will certainly keep you posted (with a few pics along the way) as soon as the Permatex and time turns up, hopefully I won't find a scored up barrel nightmare..!!!
Hi Alan, another thing I am interested in is what the barrel bolt centers are and if you could bolt a 125 barrel onto it. These would be far easier to pick up than the 85cc ones. I have only ever seen one of the lightweights and I didn't bother getting it at the time
Ok thanks Gadge, I will keep my eye out for one just out of curiosity, kicking myself for not grabbing the one I was offered, he probably only wanted $20 for it and it looked in reasonable condition
Max, I have had an email alert out for a Victa Lightweight/Compact on ebay for over 2 years now, this is the first and only one that came up in this time but it was a 3.5hr drive away on a good day (175 miles), just a tadge too far away for me.
Originally Posted by NormK
Ok thanks Gadge, I will keep my eye out for one just out of curiosity, kicking myself for not grabbing the one I was offered, he probably only wanted $20 for it and it looked in reasonable condition
I think I have mentioned it before Norm but back in 2003 I got my 1st Lightweight. This mower was in fantastic condition but sometimes it made a strange growling noise when I gave it some beans, I suspected that this was bearing noise and as I couldn't get replacement bearings I took it to the dump in the end. My heart sunk when I read a post on here a few years later (which I think was by Markelectric), it ends up he had the same problem, it turned out to be a slipping blade plate..!! I just cant forgive myself for that.
I'd love one. They punch above their weight. Prefer it to a twin.
Mowerfreak, this little machine got me hooked on Victa's nearly 20 years ago, it is so light it's a bloody joy to use but also, as you say, (and I couldn't have put it better) it really does punch well above its weight..!!!
I'd love one. They punch above their weight. Prefer it to a twin.
Mowerfreak, this little machine got me hooked on Victa's nearly 20 years ago, it is so light it's a bloody joy to use but also, as you say, (and I couldn't have put it better) it really does punch well above its weight..!!!
Or at least it did.... Hope I can get this one back up and running again without any nasty surprises..!!
Ok, got the Permaseal / Piston & Rings / Seals & plenty of beer... here we go..!!
A good clean up first:
Engine No: 320 200017 does the “320” make this a Lightweight or a Compact engine? I read on Blumbley’s post when he did his re-build: https://www.outdoorking-forum.com.au/forum/u...twins-compact-restoration.html#Post61823 From his observations the Lightweight had the 409 prefix and the Compacts had 207 or 208. Apparently the Compacts had electronic ignition and the Lightweight had points? Well this one has points so maybe this one is an early or late Lightweight?
Ah, a broken gasket... could this be part of the problem? When I last used it all of a sudden started to belch out a lot of smoke and then it wouldn’t start again until it had cooled down?
Lower crank case off, piston out next then I can inspect the barrel for damage (this is the bit I was dreading)
I have no experience but I don’t think this looks bad, certainly much better than I was expecting, maybe a clean up and a light hone along with the new piston/rings?
Bugger... hang on a minute, my replacement piston has a flat top..!!
I seem to remember that the rear cylinder on a 500 twin had a flat top - this must be it... what should I do now.. prise the rings/expanders off the flat one?
Hi Alan, thanks for the update. I personally would clean up the old piston as long as it isn't full of deep score marks. If there are minor ones, you can give them a sand to make it smooth again. The flat piston will reduce compression, by how much I don't know but better to reuse the old one unless you can exchange it the flat crowned piston. I would also clean the carbon out of the end of the bore as best you can while you have it apart. Maybe try degreaser or acetone/carby cleaner.
Ahh, if only victa had kept producing the thumblatch catcher series, they would be in better shape today!
I agree, the old piston looks good, no real scratches on it. I'm a bit worried about breaking the rings in the process but I guess I have to do it.
I don't have any carb cleaner/acetone to hand so I'm gonna soak the cylinder/crank in diesel overnight to see if that softens the carbon up, then a bit of elbow grease I suppose.
As usual, thanks again for the advice. This is the first time I have stripped an engine down to this level, its nice to know that there is help here if you need it.
Hi Alan, Just be firm but gentle with the rings, practice getting the old rings off without breaking them, gently push them apart using both your thumbs, not too wide just enough for the opposite side of the rings to come clear of the piston. If you break an old you are doing something wrong so try a different way. To get the rings into the bore it is not going to be easy but my method would be to cut a strip of sheet metal about 25mm wide and long enough to wrap around the piston and overlap a bit then with a worm drive clip tighten it up so it is snug and the rings are compressed but not over tight as the sheet metal strip has to be able to slide off the rings as you gently tap (use the hammer handle lengthwise) to gently tap the crank back into position and the rings inside the bore. Then you have to be able to undo the worm drive and get the sheet metal strip out. Just go slowly and you should be ok. If it feels like the rings don't want to enter the bore you will have to pull it out again and make sure the sheet metal strip is holding the rings in. It has to go together gently, don't force it, this is where you can break a ring
Hi guys, why must they put in drum beats Inc some how to videos? Do some viewers need to be constantly entertained or turn off in the middle of a five minute video? Also I have no idea of all those American cleaning products he showed us. I don't recognise them here. They are really spoilt for choice over there, though you can usually find an equivalent over here somewhere -at a higher cost usually.
If people don't mind me asking here, how do I clean the caked up exhaust port of a 125 I have, without getting bits into the engine?
Ahh, if only victa had kept producing the thumblatch catcher series, they would be in better shape today!







![[Linked Image]](https://www.outdoorking-forum.com.au/forum/ubbthreads.php/ubb/download/Number/11926/filename/IMG_2302.JPG)
![[Linked Image]](https://www.outdoorking-forum.com.au/forum/ubbthreads.php/ubb/download/Number/11927/filename/IMG_2306resized.jpg)
![[Linked Image]](https://www.outdoorking-forum.com.au/forum/ubbthreads.php/ubb/download/Number/11928/filename/IMG_2338.JPG)
![[Linked Image]](https://www.outdoorking-forum.com.au/forum/ubbthreads.php/ubb/download/Number/11929/filename/IMG_2357.JPG)
![[Linked Image]](https://www.outdoorking-forum.com.au/forum/ubbthreads.php/ubb/download/Number/11930/filename/IMG_2362.JPG)
![[Linked Image]](https://www.outdoorking-forum.com.au/forum/ubbthreads.php/ubb/download/Number/11932/filename/IMG_2401resized.jpg)
![[Linked Image]](https://www.outdoorking-forum.com.au/forum/ubbthreads.php/ubb/download/Number/11931/filename/IMG_2370.JPG)