Hi, new to the forum and new to Kirby Tecumseh I have decided to take on the rebuild path to the original Scott Bonnar 45 engine rather than replacing it with something else to keep it all original. The engine seems to be all there and serviceable but details and parts are a bit sketchy, I have found a parts diagram on this forum but it's a Scott Bonnar diagram which seems to have SB part# or Kirby part #. The only parts available online are from the parent company Tecumseh US which seem to have different model engine numbers and part# as well as slightly different parts. As I have never worked on a Kirby Tecumseh before it's all trial and error so guessing between US diagrams with Aussie ones is getting a little frustrating.
So my main question is can anyone confirm replacement part numbers for main serviceable parts as there are many people restoring these engines here with great success but there's no reference to the part numbers they ordered to make life easier and confirm comparability.
I'm assuming U.S Tecumseh H25 is the equivalent Kirby H4-4A engine with a different carburettor, filter, exhaust, correct me if I'm wrong. So my next question is the aftermarket carby kit available online for the Tecumseh H25, it comes with a needle seat, spring and a bowl gasket. The needle in mine doesn't have a spring and the needle doesn't have a raised notch for the spring to slot in, there is also no rubber seat in my carby should it have one? Am I missing parts or is it a different design
Main parts I would like to replace and confirm U.S part numbers are. Piston ring set std Pto oil seal Carby kit set Gasket kit set
A good place to find parts is MFG Supply in the States. Rings, carby kits and gasket kits. I have used them regularly and H25/30 parts should be listed ok. Should get all parts less the PTO seal which is a 28540 part number from memory. This can be sourced from a mower shop who has an account with GA Spares as you can't buy directly from them. My carb just had a brass needle and no rubber seal. Regards, Mr Jones.
The confusion is basically this, you won't find anything under the model numbers of HK as the K stands for Kirby which was only here in Australia and made under license from Tecumseh in the USA.
Cheers, BB.
I live a 24 Hour lifestyle, but every now and again I seem to fall asleep, well at least that's what my wife tells me.
Thanks Mr. Jones for some clarification with the needle and seat and after my research over the last few days I worked out that the PTO oil seal was the same part number you quoted 28540. I have attached a Tecumseh parts guide for any one else interested in parts as not all H25, H30 engines use the same parts as there are different series of H25, H30. My local mower shop had a Tecumseh HK30 oil seal and it wasn't the same size as mine and according to a parts diagrame I found online there were 4 different oil seal part numbers for the H30 engine (28540 was one of them and the parts guide attached confirmed it with the measurements).
So for anyone wanting to rebuild a Kirby H4-4A these are the part numbers I'm using Rings std # 27565 Gasket set # 33233 PTO oil seal # 28540 Carby kit # ?
Also would anyone have photos of inside the muffler mines missing the baffle, just want to see how it's supposed to be so I can re-build a new baffle.
Bon_Scott, if you intend to remove the side cover from the crankcase, be aware that it's necessary to remove the oil seal first, as there's a bearing retainer circlip behind it! This prevents cover removal, if it's not removed first.
The shop manual method is to drill the face of the seal in two places on opposite sides, then screw a couple of short self-tapping pan head screws into the holes. Then use a pair of long nose pliers under the screwheads to pry the seal out - or a long flat blade screwdriver and spacer/fulcrum piece will work too.
Cheers, Gadge
"ODK Mods can explain it to you, but they can't understand it for you..."
"Crazy can be medicated, ignorance can be educated - but there is no cure for stupid..."
It's already off and engine disassembled, definately is a crap design but my oil seal dident quiet survive my first attempt. I would attempt it better if I had to do it again but you learn from your mistakes. You would also think this would be a more common part considering it has to be distroyed every time it comes off. I will try and source the oil seal this week and start preparing the engine for painting and hopefully can start the re-build process.
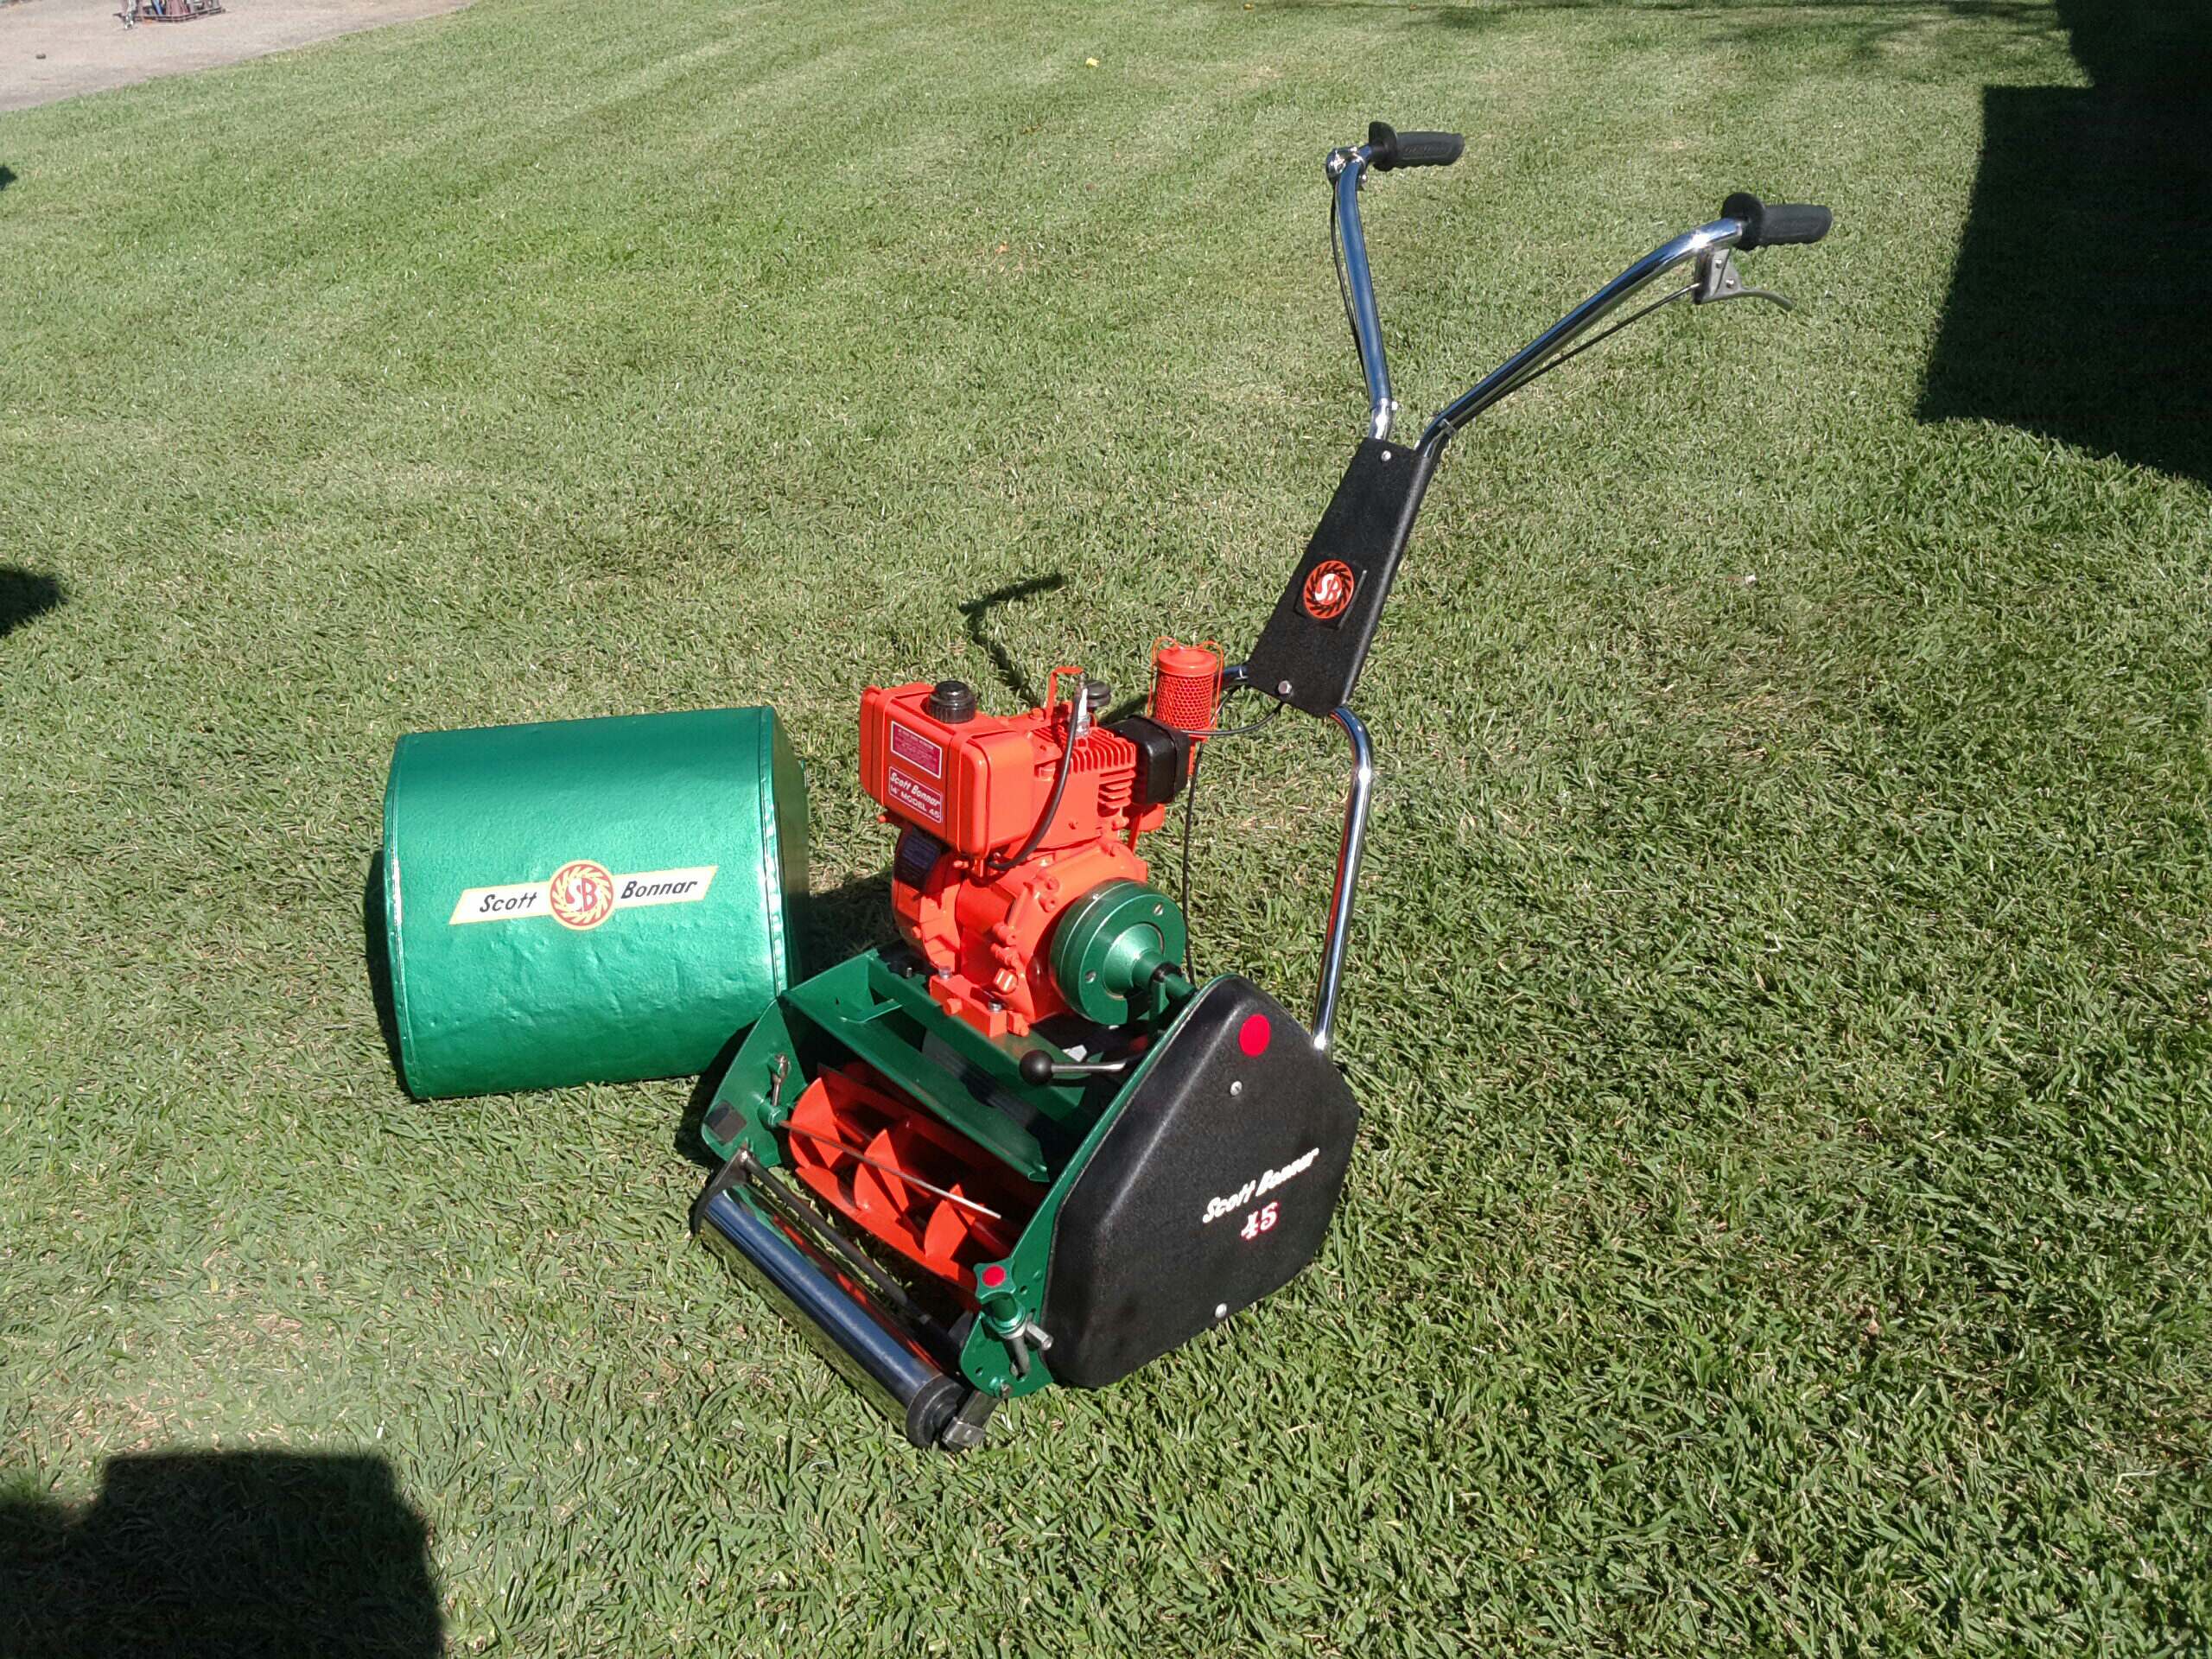
Quick update guys with the Kirby, got the block prepared and painted, just need to install the guts once the paint fully cures. All that's left to do is the tank and recoil shroud and decals. The colour I used was Chevrolet Orange DE1620 which looks pretty close to the original colour (in some photos it looks more red and others it looks orange) I also baked the engine for a nice hard durable finish, and no I dident use the kitchen oven I got a dedicated oven I use outside for painting only.
I stumbled across oven baking by accident researching paints on another forum and someone suggested using the home oven. There was alot of different reactions to people using your everyday kitchen oven due to chemicals and food mixing aswell as the fumes so I found a free giveaway working oven on Gumtree and used my dedicated 15A PowerPoint I have installed in the fusebox for the caravan and it works fine. Considering you don't crank the oven up full ball and run the griller at the same time it doesn't draw anywhere near full current. I figured that engine enamel paint is better than normal automotive paint and the Dupli Color brand seemed more recommended online then VHT and everyone was baking there engine parts with success. I had a choice of Hemi Orange, Rocket Red & Chevrolet Orange-Red, the guy at the auto store put all the colours side by side and I compared the colours with the fuel tank I hadent stripped down yet and Chevrolet Orange was the best match (don't confuse it with Chevrolet Orange-Red). Anyways I let the paint dry outside for 1-2 hours then stuck it in the oven for 1 hour at 95C-100C, the results are amazing and the finish is flawless. I gave it 2 light coats of primer and 3 coats of paint (2 light coats and one wet coat). All coats were done with in 1 hour as instructed on the can and re-coats applied after 10 minutes. I was pleased with the results as this was my first attempt with baking paint and I had no problems, just remember to remove anything plastic or rubber that may melt I left the oil sump plugs in and they were fine. Engine is complete just waiting for decals to arrive, some paint did chip on the bolts when I put it all together so you may have to wait longer for the paint to cure but I just touched them up by spraying the paint in the lid and using a paint brush and you can't even notice it.
Can anyone confirm if the reel blade is the same colour as the engine? Guessing Kirby had their own paint Color and Scott Bonnar had their own paint as well as Briggs being a different Color aswell, The reel on mine looks more red than orange, I don't have to use high temp engine paint on the reel, what's everyone's thoughts on the Chevrolet Orange for the reel?
You are correct that the reels were originally more of an "Orangey" colour opposed to Red but most people prefer the red and thus why it's used more I guess. The orange just looks a tad dated on the reel, while the red looks a tad sharper today.
Yes you are correct regarding the engine manufacturers using their own colours and supplying a finished product to each individual product manufacturer to simply fit straight on.
Briggs used a somewhat different colour to Kirby. The Kirby shade is a tad deeper with a bit more of a red under tone while Briggs used a brighter orange similar to Chevy Orange.
Cheers, BB.
I live a 24 Hour lifestyle, but every now and again I seem to fall asleep, well at least that's what my wife tells me.
Thanks for that info I might clean the reel up a bit and get some of the dirt off it and see if the original paint comes through a bit better to get an idea on colour and then decide to go same as the engine or redish. I know this is not anything to do with the engine section i will start a new thread for the base restoration in the correct thread when I start but do most people paint the reel before getting it sharpened or do you get it sent off first then paint? Will send through final pics of engine with decals once they arrive. Also for reference I filled the sump with Castrol GTX 20W-50 and it took 500ml to over flow.
Thanks for the complement you will be hearing and seeing more of me as I go on to the next steps with the Scotty. Are you sure it's sae30 oil? My service sticker says use Castrol XL 20W-50 oil.
Yep I should've known that this would come back and bite me on the bum.
Most of the industry will only use SAE-30 on most of these stationary type of engines, but yes you can use what you've put in I guess.
Actually GTX was always considered the most garbage oil made. It had huge amounts of marketing put behind it and sold by the pallet load here in Australia where the oil market was huge, but in saying that a "Better Class of Mechanic" would never use GTX with all it's friction modifiers.
I've actually still got an old 4 litre container with some old GTX here and only use it as crap spot oiling in an oil can for hinges or anything that needs some slippery stuff on it that I won't cry over it's wastage.
I now use Synthetic 30 and no more mineral oil at all in anything that I rebuild or service. Synthetics are just a far better standard of oil and that's the way most manufacturers are heading towards.
Cheers, BB.
I live a 24 Hour lifestyle, but every now and again I seem to fall asleep, well at least that's what my wife tells me.
Ok thanks loving all the info I get here, at the moment it's in the sump keeping everything nice and oily so it doesn't rust up inside. I only bought the GTX because Repco was clearing out the small bottles cheap when I went down to get a new spark plug and it happened to be Castrol 20W-50 as stated on the service sticker so I figured it would be o.k. It was cheap enough to pour back into the bottle and use it for something else, it still may be a long way down the track before I mount the engine back on and start it up so I will look into it when it's ready to go. Should of taken note of those old Castrol GTX2 adds in the 80's "Oils ain't oils"
G'day ModBB and Bon_Scott I feel there is a lot emotive puffery in understanding oils.
When I worked for a major oil maker - if you know what I men - I came to realize that marketing was a smoke screen to oil reality. Same oils were re-branded to reflect 'market placement' and ... profit.
The best guide for oil grade use was:- The mower manufacturer's specification at the time (NOT brand); The oil maker's claimed specification at the time.
When multi-grade oils hit the market I feel it was natural that AUS mower makers would specify them - given the vast differences in climate across this broad nation.
I'm sure - given the collaboration between mower makers and oil companies - that recommendations followed profit, not differences in oil actually required to do the job.
GTX was a great oil - but no different to any other oil claiming the same specification. As Modd BB suggested, advertising hype and puffery just disguised the reality.
Glo Mod Gadge is best qualified to answer this, because of his direct experience in this industry.
Interesting topic ----------------------------- Jack