|
1 members (Dandare),
1,246
guests, and
1,400
robots. |
|
Key:
Admin,
Global Mod,
Mod
|
|
|
|
Joined: Jul 2005
Posts: 6,362 Likes: 11
Administrator - Master Technician
|
Hi tezza98_tnharris, and a big warm welcome to the forum. It is always nice to see another Scott Bonnar enthusiast about to commence a restoration, and we're here to help in any way we can. We're looking forward to seeing your pics, which would allow us to identify your model exactly. Basically you're right Tezz, your machine fits into the Scott Bonnar (SB) lineage after the Bonmow (1953) and after the Model 45 (1968) and is actually part of the later Model 45 line-up was probably manufactured in the period late 1974 and I presume that it would have a 3 HP Briggs and Stratton fitted. Regarding your questions, I will try and answer them in turn; Turf Machinery Services have closed down, Keith Lewis, the proprietor, is at present looking for new premises as his last building was sold out from under him, and the site is being re-developed. All his stock is now in storage. He has given no time frame as to when he will be up and running again. Our On-line Store here at Outdoorking is now the place to purchase any parts you may need. As to the sharpening of the cylinder reel Tezz, I hate to burst your bubble, but there is no way you can sharpen a cylinder reel by hand. The reason for this is in the design of the reel itself...the blades are not straight; it is a helix spiral and therefore has to be ground in a lathe whilst it is spinning at a precise RPM, and the grindstone, also spinning, has a perfectly flat face and is introduced to it. The bottom knife blade which has to be perfectly flat, has to be ground, then the front edge is ground to ensure a perfect edge. This ensures perfect alignment with one to the other. This cannot be done by hand. The machinist I use here in Wagga charges me $70 and in my book is money well spent. It is also at that time, razor sharp. In order to find an engineering workshop that can do this for you, contact your local Bowling Club, and find out who does their cylinder reels.  When replaced on the mower (assuming the reel bearings are in perfect condition) the resulting adjustment is relatively easy, (though a bit tricky at first). The reel should spin quite freely by hand, and has very slight clearance (minimal) between the cylinder reel and bed-knife blade Regarding Spare Parts and Owners Manual for your machine, they can be accessed in the Lawnmower Parts lists and Manuals topic located at the bottom of Questions on Lawnmowers and Engines forum. In order to access the parts list and manuals area you need to follow these steps. 1.Click My Stuff at the top of the forum. 2.Then click subscriptions. 3.Then click more details after selecting the area that you are interested in. 4.Then click the PayPal option. 5.Then click subscribe. 6.If you don't have a PayPal account don't worry because you can use a credit card to pay by clicking the option at the bottom of the screen (it is there just look carefully and you will see it). 7.After making payment you should have access to the area you subscribed to. Note: That if you can not access the area try these steps first before contacting us. 1.Click My Stuff at top of forum. 2.Click cookies. 3.Click expire cookies. This will log you out and you will have to login again and usually this works for issues with access to the parts list and manuals area that you have subscribed to. The process of subscribing is automatic using PayPal. The reason for this is, in the past we had members complaining about having to wait for us to approve the payment by the means of a donation, and it is now forum policy, in order to access the parts list and manuals areas. There are other members presently restoring Scott Bonnars, such as deviosi, you might like to check out his posts, and my Scotty restored pics are in the Old Mower Pictures topic in the thread "Scott Bonnar Restored" Tezz, once again  
Please do not PM me asking for support. Please post your questions in the appropriate forums, as the replies it may receive may help all members, not just the individual member. Kindest Regards, Darryl 
|
|
|
|
|
Joined: Nov 2009
Posts: 134
Apprentice level 2
|
thanks ill update my images throughout the day with a more reliable image host 
|
|
|
|
|
Joined: Jul 2005
Posts: 6,362 Likes: 11
Administrator - Master Technician
|
Hi Tezza, No worries, mate, we'll all look forward to seeing them.
Please do not PM me asking for support. Please post your questions in the appropriate forums, as the replies it may receive may help all members, not just the individual member. Kindest Regards, Darryl
|
|
|
|
|
Joined: Nov 2009
Posts: 134
Apprentice level 2
|
Last edited by grumpy; 29/12/10 06:53 AM. Reason: Localise images
|
|
|
|
|
Joined: Nov 2009
Posts: 134
Apprentice level 2
|
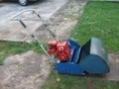
![[Linked Image]](https://www.outdoorking-forum.com.au/forum/uploads/usergals/2010/12/full-2772-143-img_9123.jpg) ![[Linked Image]](https://www.outdoorking-forum.com.au/forum/uploads/usergals/2010/12/full-2772-144-img_9124.jpg) ![[Linked Image]](https://www.outdoorking-forum.com.au/forum/uploads/usergals/2010/12/full-2772-145-img_9125.jpg) ![[Linked Image]](https://www.outdoorking-forum.com.au/forum/uploads/usergals/2010/12/full-2772-146-img_9126.jpg) ![[Linked Image]](https://www.outdoorking-forum.com.au/forum/uploads/usergals/2010/12/full-2772-147-img_9127.jpg) so heres the before images, using a reputable image host right-click view image to see full size its a scott bonnar lawn king with a a B&S 2hp engine engine number is 60102 0347-01 74061401 Mower number 00826 Model 450546 im going to strip down the engine and replace all the gaskets etc, carby parts etc. doesnt need a rebuild theres plenty of compression and it runs fairly well. New bolts as well since they are rusty, and some new decals and finally some engine paint. Im sourcing most of my engine parts from this site as well as http://www.rcpw.com/ and http://www.jackssmallengines.com/ , they seem to deliver to tasmania. if you know any other places to source parts for the engine please let me know. As for the actual frame im facing a little dilemma, i was originally planning to source parts from http://www.turfmachinery.com.au but since they arent avaiable and this site lacks certain scott bonnar parts, im stuck with where to get parts from. Im really only after new nuts and bolts etc as everything works. Am starting the engine strip down this week end , will update you guys with pics of how that proceeding
Last edited by grumpy; 29/12/10 06:46 AM. Reason: Localise images
|
|
|
|
|
Joined: Dec 1999
Posts: 5,427 Likes: 36
Repair Junkie
|
tezza98_tnharris aboard to the forum and I am glad that you have found a good host for your pictures which we all love to see here. Have you had a look at the online store which is under site link because they are uploading parts for a lot of different products as well as the Scott Bonnar mower. So I would suggest that you have a look and if you can't find what you are looking for just ask them and most of the time they upload it within a few hours. Once again welcome abord to the forum and I hope that you enjoy it as much as I do.
Regards, ![[Linked Image]](https://www.outdoorking-forum.com.au/forum/images/members/mower-monsterw.jpg) Bruce Please do not PM me asking for support. Post on the forums as it helps all members not just the individual.
|
|
|
|
|
Joined: Jul 2005
Posts: 6,362 Likes: 11
Administrator - Master Technician
|
Hi tezza98_tnharris, New bolts as well since they are rusty, and some new decals and finally some engine paint Tezza, I would presume that most of the original nuts and bolts would be Imperial sizes (ie. SAE or A/F) some of which maybe hard to source but you could try this link: Click HEREAs for early Scott Bonnar decals and stickers, they are impossible to get at present; if the one on your catcher is OK, try and preserve it by careful masking, before painting. For the engine paint, Repco have a spray can of heatproof engine enamel in orange that is very close to the original B & S colour. Hope this is of some help,
Please do not PM me asking for support. Please post your questions in the appropriate forums, as the replies it may receive may help all members, not just the individual member. Kindest Regards, Darryl
|
|
|
|
|
Joined: Nov 2009
Posts: 134
Apprentice level 2
|
yeah i can get the nuts and bolts from here as exact replacements http://www.rcpw.com/briggs-stratton-parts/genuine/94547.html.and the engine decals im looking to get from http://www.bser.com.as for the scott bonnar decals, they have to come off the catcher cos its got lots of surface rust, ill take a few snaps and measurements and try to make one some up in photoshop etc, along with any other decals that i cant source also any ideas on how to get the Blue cylinder clutch thingy off the enginge, the whole thing came away from the lever assembly easy, but it is stuck fast to the actual engine
|
|
|
|
|
Joined: Dec 1999
Posts: 5,427 Likes: 36
Repair Junkie
|
tezza98_tnharris, Usually they have a bolt with a nut that locks onto the shaft when done up. You will have to partly undo the nut and tap it to re-leave it from the engine shaft and it will then slide off.
Regards, Bruce Please do not PM me asking for support. Post on the forums as it helps all members not just the individual.
|
|
|
|
|
Joined: Jul 2005
Posts: 6,362 Likes: 11
Administrator - Master Technician
|
Yeah, Bruce, you're spot on there mate, It's called a clevis pin and tapers from top to bottom, so it releases when it is tapped down.
Please do not PM me asking for support. Please post your questions in the appropriate forums, as the replies it may receive may help all members, not just the individual member. Kindest Regards, Darryl
|
|
|
|
|
Joined: Nov 2009
Posts: 134
Apprentice level 2
|
thanks ill give that a try later today
|
|
|
|
|
Joined: Jul 2005
Posts: 6,362 Likes: 11
Administrator - Master Technician
|
No worries Tezza, let us know how you get on.
Please do not PM me asking for support. Please post your questions in the appropriate forums, as the replies it may receive may help all members, not just the individual member. Kindest Regards, Darryl
|
|
|
|
|
Joined: Dec 1999
Posts: 5,427 Likes: 36
Repair Junkie
|
Darryl a lot of people do not realise that you need to tap it in order for the housing to be able to be removed.
Regards, Bruce Please do not PM me asking for support. Post on the forums as it helps all members not just the individual.
|
|
|
|
|
Joined: Nov 2009
Posts: 134
Apprentice level 2
|
no luck getting it removed from the engine at all, i whacked that nut and thread but it didnt budge at all.
|
|
|
|
|
Joined: Jul 2005
Posts: 6,362 Likes: 11
Administrator - Master Technician
|
Hi Tezza, as your machine looks well weathered, the pin may have surface rust on it and be partially seized to the engine shaft. Try WD40 or penetrating oil on it, after temporarily removing the nut, and let it soak in....for a reasonable amount of time, replace the nut.....then try tapping it again, it should release.
Please do not PM me asking for support. Please post your questions in the appropriate forums, as the replies it may receive may help all members, not just the individual member. Kindest Regards, Darryl
|
|
|
|
|
Joined: Dec 1999
Posts: 5,427 Likes: 36
Repair Junkie
|
tezza98_tnharris, As I said in my post was to tap it not whack it because the bolt has a half moon cut out in it which catches on the shaft when you do it up. My next suggestion is to go around the housing where the bolt is and TAP it not whack it and all going well it will release. Note that you might have to use a tyre lever or a screw driver to try to lever the housing while tapping it.
Regards, Bruce Please do not PM me asking for support. Post on the forums as it helps all members not just the individual.
|
|
|
|
|
Joined: Nov 2009
Posts: 134
Apprentice level 2
|
ah iknow what bolt your talking about now, ive sprayed it with crc so will try again later to remove it
|
|
|
|
|
Joined: Nov 2009
Posts: 134
Apprentice level 2
|
i got the damn thing off, had to end up tapping it of with a block of wood and a hammer, now i can finish stripping down the engine
|
|
|
|
|
Joined: Dec 1999
Posts: 5,427 Likes: 36
Repair Junkie
|
tezza98_tnharris how was the bearing for the clutch.
Regards, Bruce Please do not PM me asking for support. Post on the forums as it helps all members not just the individual.
|
|
|
|
|
Joined: Nov 2009
Posts: 134
Apprentice level 2
|
what do you mean the bearing?
that blue clutch thing i havent taken apart yet, but everything looks pretty good.
ill post pics later today as im stripping back the frame today as i have to wait for my engine parts.
|
|
|
|
|
Joined: Dec 1999
Posts: 5,427 Likes: 36
Repair Junkie
|
This is the bearing that I am talking about ![[Linked Image]](https://www.outdoorking-forum.com.au/bmz_cache/e/eb1f27300b3e3e9fae0a4fb6afef21c1.image.138x120.jpg) it is inside the clutch housing which is located HERE on the online store.
Regards, Bruce Please do not PM me asking for support. Post on the forums as it helps all members not just the individual.
|
|
|
|
|
Joined: Nov 2009
Posts: 134
Apprentice level 2
|
Last edited by grumpy; 21/01/11 03:48 AM. Reason: Localise images
|
|
|
|
|
Joined: May 2009
Posts: 191
Apprentice level 2
|
no turning back now looks like u have it sorted going great mate...
|
|
|
|
|
Joined: Jul 2005
Posts: 6,362 Likes: 11
Administrator - Master Technician
|
Hi Tezza, I agree with Steve there, you're definately on your way now, mate, and now the fun begins. Tezza, I was browsing some posts the other day and came across one by Mark_x11, who is restoring an early Scott Bonnar "Bonmow" which was also painted originally in a hammertone blue, it is manufactured by Septone and may be suitable for your Scotty. Mark purchased it from Supercheap Auto....Here is a pic of his during restoration: Click HEREWhat do you think?
Please do not PM me asking for support. Please post your questions in the appropriate forums, as the replies it may receive may help all members, not just the individual member. Kindest Regards, Darryl
|
|
|
|
|
Joined: Nov 2009
Posts: 134
Apprentice level 2
|
just got a quote on sharpening the reel and bottom blade assembly, should be no more the $75 bucks, but will take a couple of weeks.
In the mean time ive stripped off all the paint from the frame and am gonna prime it this week for painting on the weekend.
To stop the frame rusting in the meantime, ive got a small piece of magnesium from and old pencil sharpener and taped that to the frame, the idea being that the magnesium will rust instead of the metal. apparently this works, and im gonna find out soon wenough if it doesnt
|
|
|
|
|
Joined: Nov 2009
Posts: 134
Apprentice level 2
|
Hi Tezza, I agree with Steve there, you're definately on your way now, mate, and now the fun begins. Tezza, I was browsing some posts the other day and came across one by Mark_x11, who is restoring an early Scott Bonnar "Bonmow" which was also painted originally in a hammertone blue, it is manufactured by Septone and may be suitable for your Scotty. Mark purchased it from Supercheap Auto....Here is a pic of his during restoration: Click HEREWhat do you think? thats the exact paint im gonna get, i saw it in SuperCheap on Saturday.
|
|
|
|
|
Joined: Jul 2005
Posts: 6,362 Likes: 11
Administrator - Master Technician
|
No worries. Tezza, it should look brilliant!! I'm glad that you're getting the reel and bottom blade professionally sharpened, providing that the cylinder reel bearings are serviceable, it should give your lawn a beautiful finish and the classic stripes. Best of luck with the rest of the restoration.
Please do not PM me asking for support. Please post your questions in the appropriate forums, as the replies it may receive may help all members, not just the individual member. Kindest Regards, Darryl
|
|
|
|
|
Joined: Nov 2009
Posts: 134
Apprentice level 2
|
well i finally got around to painting the frame and frame parts today, everything is painted except the deflector, the catcher, and the chain guard.
it does really look a treat too, next week getting the blade sharpened and a new bottom blade fitted.
Pics to follow
|
|
|
|
|
Joined: Jul 2005
Posts: 6,362 Likes: 11
Administrator - Master Technician
|
Hi Tezza, Looking forward to seeing the pics, mate. It should look brilliant!
Please do not PM me asking for support. Please post your questions in the appropriate forums, as the replies it may receive may help all members, not just the individual member. Kindest Regards, Darryl
|
|
|
|
|
Joined: Nov 2009
Posts: 134
Apprentice level 2
|
so here are the pics of my painted frame parts and frame. I used a single coat of Septone Hammertone Blue, which is the closest of the shelf colour match that i could get. I only used a single coat with no undercoat, as having a thin layer of paint is easier to repair since ill be using this mower. the frame ![[Linked Image]](https://www.outdoorking-forum.com.au/forum/uploads/usergals/2011/01/full-2772-296-th_img_0102.jpg) ![[Linked Image]](https://www.outdoorking-forum.com.au/forum/uploads/usergals/2011/01/full-2772-297-th_img_0110.jpg) ![[Linked Image]](https://www.outdoorking-forum.com.au/forum/uploads/usergals/2011/01/full-2772-298-th_img_0112.jpg) ![[Linked Image]](https://www.outdoorking-forum.com.au/forum/uploads/usergals/2011/01/full-2772-299-th_img_0113.jpg)
Last edited by grumpy; 21/01/11 03:53 AM. Reason: Localise images
|
|
|
|
Forums144
Topics12,729
Posts106,674
Members17,969
| |
Most Online40,124
Apr 13th, 2026
|
|
|
|


![[Linked Image]](https://www.outdoorking-forum.com.au/forum/uploads/usergals/2010/12/full-2772-148-img_9117.jpg)
![[Linked Image]](https://www.outdoorking-forum.com.au/forum/uploads/usergals/2010/12/full-2772-149-img_9118.jpg)
![[Linked Image]](https://www.outdoorking-forum.com.au/forum/uploads/usergals/2010/12/full-2772-150-img_9119.jpg)
![[Linked Image]](https://www.outdoorking-forum.com.au/forum/uploads/usergals/2010/12/full-2772-151-img_9120.jpg)
![[Linked Image]](https://www.outdoorking-forum.com.au/forum/uploads/usergals/2010/12/full-2772-152-img_9121.jpg)
![[Linked Image]](https://www.outdoorking-forum.com.au/forum/uploads/usergals/2010/12/full-2772-153-img_9122.jpg)

![[Linked Image]](https://www.outdoorking-forum.com.au/forum/uploads/usergals/2011/01/full-2772-289-img_9180.jpg)
![[Linked Image]](https://www.outdoorking-forum.com.au/forum/uploads/usergals/2011/01/full-2772-290-img_9181.jpg)
![[Linked Image]](https://www.outdoorking-forum.com.au/forum/uploads/usergals/2011/01/full-2772-291-img_9182.jpg)
![[Linked Image]](https://www.outdoorking-forum.com.au/forum/uploads/usergals/2011/01/full-2772-292-img_9183.jpg)
![[Linked Image]](https://www.outdoorking-forum.com.au/forum/uploads/usergals/2011/01/full-2772-293-img_9184.jpg)
![[Linked Image]](https://www.outdoorking-forum.com.au/forum/uploads/usergals/2011/01/full-2772-294-img_9185.jpg)
![[Linked Image]](https://www.outdoorking-forum.com.au/forum/uploads/usergals/2011/01/full-2772-295-img_9186.jpg)


